
Want to create an in-house discount plan or membership plan for your dental practice? With so many patients lacking dental insurance and many offices dropping PPO plans due to low payouts and obscure rules, offering patients an in-house discount plan is an easy way to empower patients to follow through on treatment without the headaches.
On this page, we’ll walk you through the technical setup and use of in-house discount plans in Practice-Web as well as some details on how to promote and administer your plan.
- Creating Your In-House Discount Plan
- Step 1: Determine Your Fees and Charges
- Step 2: Create an Adjustment Type
- Step 3: Create a Procedure Code for Your Membership Fee
- Step 4: Create the Fee Schedule in Practice-Web and Edit Your Fees
- Step 5: Create a Discount Plan in Practice-Web
- Step 6: Write Your Contract
- Step 7: Create Patient Documentation/ Informational Materials
- Step 8: Train Your Team
- Using Your In-House Discount Plan
- Tracking Your In-House Discount Plan in Practice-Web
- Discount Plan List Report
- Daily Adjustments Report
- Discount Plan Reporting FAQ
- How do I view how many patients are on a specific Discount Plan?
- How do I view how many patients have ever been on a specific Discount Plan?
- How do I view total charges for discount plan fees?
- How do I view my total write-offs for a specific Discount Plan?
- How do I view my total income from patients on a Discount Plan?
- Get Help Setting Up Your Dental Practice Discount Plan
- Query for Discount Plan Fees and Adjustments
Creating Your In-House Discount Plan
Discount plans can only be added to patients who do not have insurance but they’re incredibly versatile. For example, you can create:
- Tiered discount programs (preventative only, 10% off, 25% off, silver, gold, etc.)
- Individual and family discount programs
- Student and senior discount programs
- And more
Step 1: Determine Your Fees and Charges
Before you take any other steps, practice stakeholders (the dentist, office manager, non-dentist owner, etc.) should have a discussion about the discounts you want to offer.
Many practices opt to provide anywhere from 10-50 percent discount off their UCR fees, while others do a percentage off, then write off preventative and diagnostic services entirely, and others henpeck individual fees to reduce charges on. Ultimately, the choice is yours, though it should generally be a group discussion to ensure patients get their needs met without diminishing practice profitability.
In addition to the procedure-based fees, you’ll need to decide how your membership fee will be handled. A one-time annual fee is easiest to set up and manage though it’s possible to create monthly recurring charges too. You’ll also want to have individual and family membership fee amounts determined if applicable.
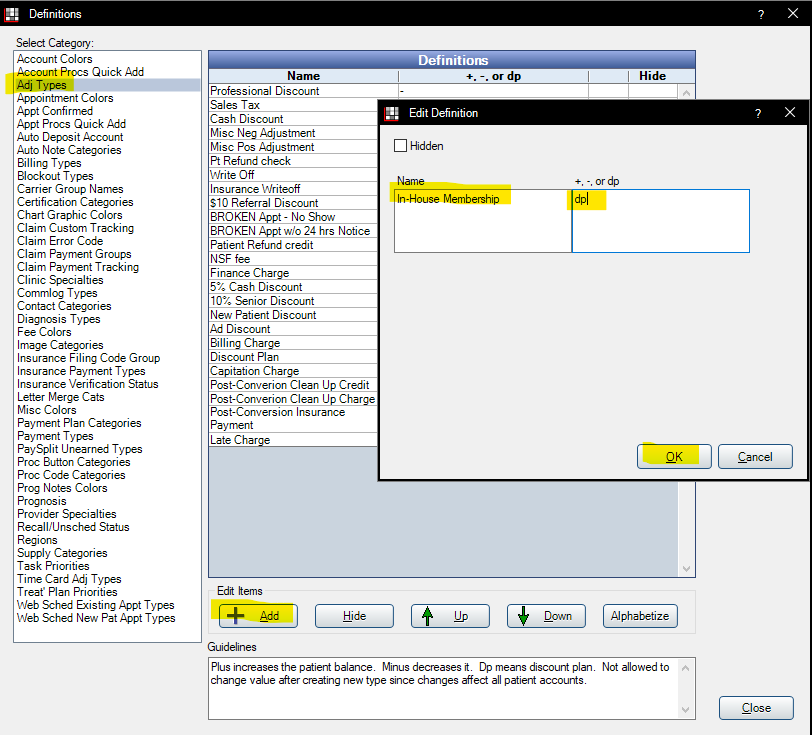
Step 2: Create an Adjustment Type
Adjustment Types help you identify discounts from your discount plan on the ledger and track them in reports. The name you give your adjustment type will appear in the patient accounts and statements, so ensure you choose something that’s patient-friendly and can be easily distinguished from other discounts and adjustments your practice makes. For example, “In-House Membership” or “Premium Membership.”
To create the Adjustment Type:
- From the Main Menu, choose “Setup” and then select “Definitions.”
- From the Definitions window, choose “Adj Types.”
- Click “Add.”
- In the “Edit Definitions” window, type the name of your Adjustment Type (i.e. In-House Membership) and then “dp” in the next column to signify it’s a discount plan.
- Click “Ok” to save and exit.
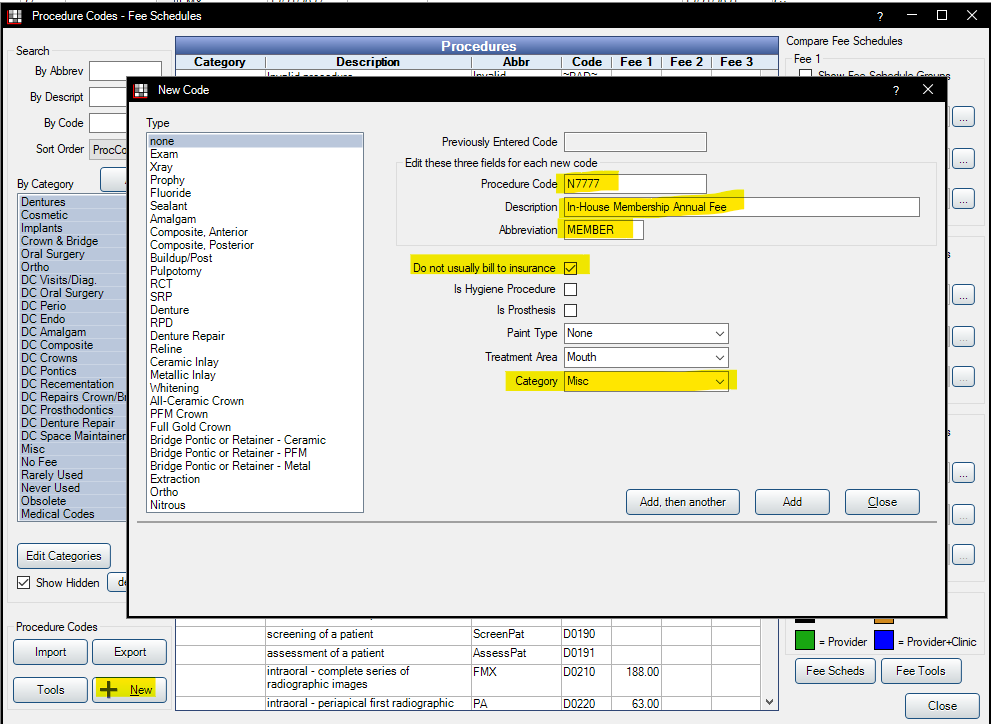
Step 3: Create a Procedure Code for Your Membership Fee
In this example, we’re working with an individual annual membership fee. If you’d like to offer a discount plan for families, you’ll create another procedure code with the alternate amount when finished.
Start by adding a code for your annual membership fee.
- From the Main Menu, choose “Lists” and then select “Procedure Codes.”
- Click “Add.” The “New Code” window will open.
- In the “Procedure Code” space, enter a code of your choosing. You can use anything you want as long as it doesn’t begin with the letter “D,” so as not to confuse it with standard CDT dental billing codes.
- In the Description” field, briefly explain what the charge is for.
- In the “Abbreviation” field, create a shortcode for your charge.
- Check the box for “Do not usually bill to insurance.”
- Click the “Add” button to save and close.
Step 4: Create the Fee Schedule in Practice-Web and Edit Your Fees
Next, you’ll create a blank fee schedule for your membership plan.
- From the Main Menu, choose “Lists” and then select “Procedure Codes.”
- From the Procedure Codes – Fee Schedules window, click the “Fee Scheds” button.
- From the Fee Schedules window, click “Add.”
- Type the name of your discount plan (i.e. In-House Membership).
- Ensure the Type selected is “Normal.”
- Click “Ok” to save and close.
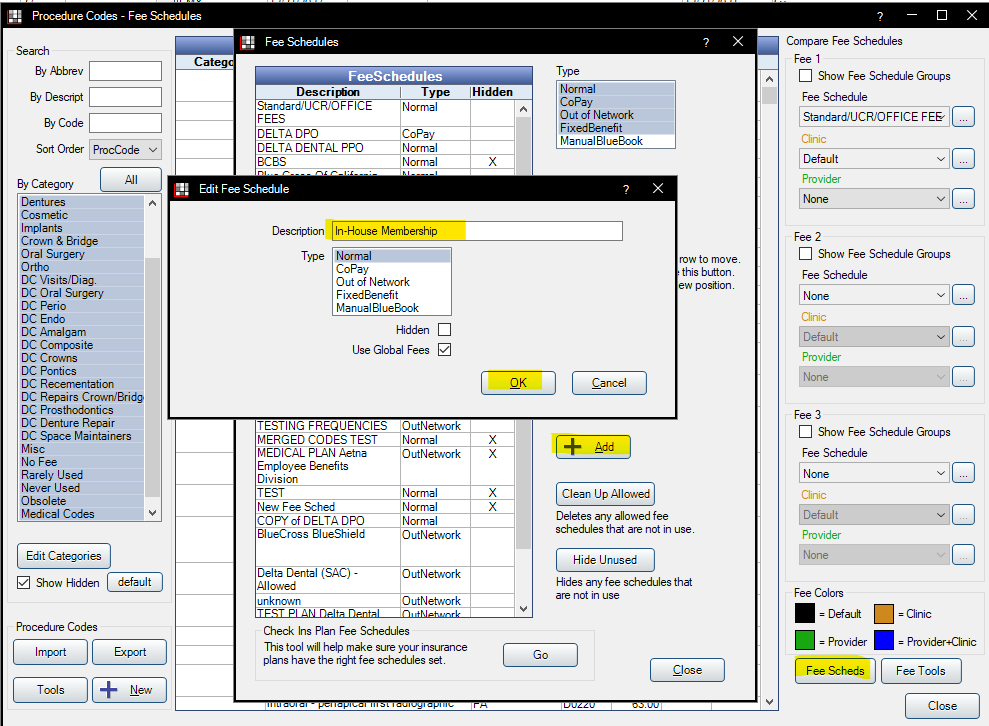
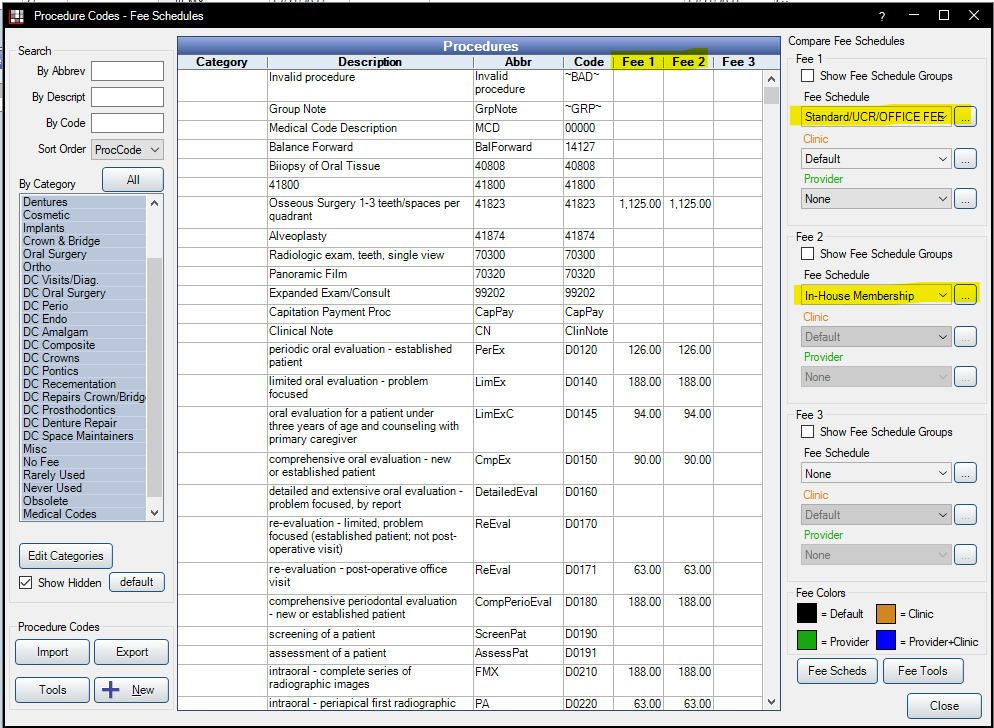
At this point, your fee schedule will exist, but it will be blank, meaning all fees will automatically default to your UCR fees. To copy over your UCR fees so you have a good starting point for editing the fees:
- From the Procedure Codes – Fee Schedules window, click the “Fee Tools” button.
- In the Select Fees, Fee Schedule dropdown, select “Standard/UCR/Office Fees.”
- In the Copy To, Fee Schedule dropdown, select your newly created fee schedule (i.e. In-House Membership).
- Click the “Copy” button.
- You may receive a pop-up warning that you’re about to override your fees. Click “ok” to proceed.
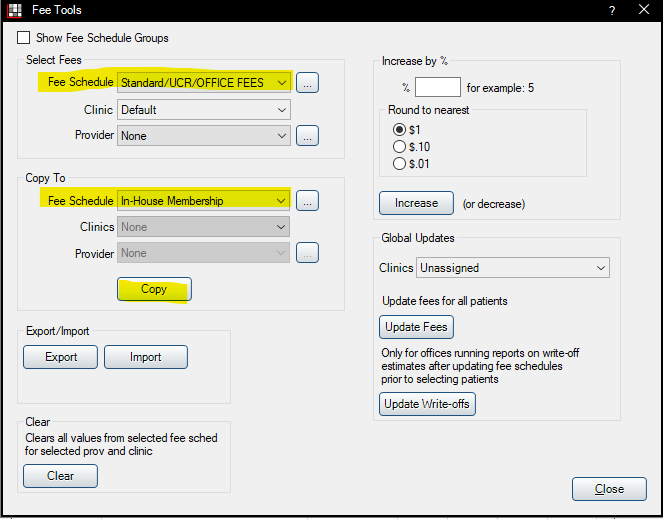
If you look at the Procedure Codes window at this point, and you have UCR Fees selected as “Fee 1” and your new discount plan fee schedule listed as “Fee 2,” you should see identical fee lists.
You’ll want to update the fees either individually or discount them as a group.
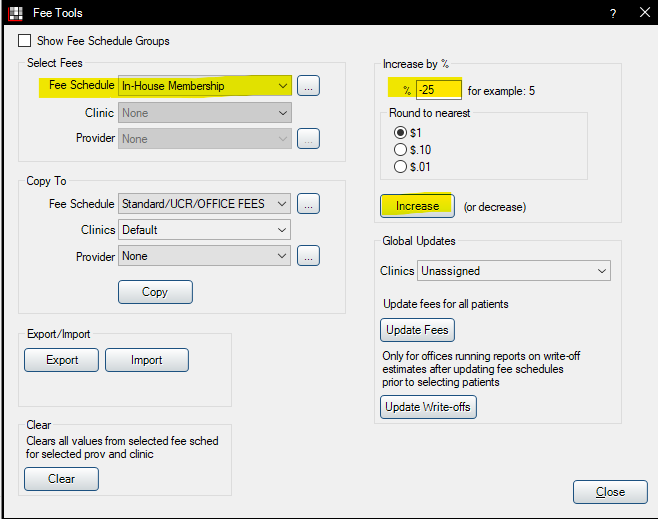
To update the full fee schedule at once:
- From the Procedure codes window, click the “Fee Tools” button. The Fee Tools window will open.
- Under Select Fees, Fee Schedule, choose your new membership plan fee schedule from the dropdown menu.
- In the “Increase by %” field, enter a minus sign and then the percent discount you want to offer your membership patients.
- Click the “Increase” button.
- You may receive a pop-up warning that you’re about to override your fees. Click “ok” to proceed.
To update an individual fee:
- Click the field you want to update and type in your new amount.
- Repeat for each fee you want to update.
- Click the “Close” button to save and exit.
You’ll want to do this to add a fee to your new membership fee code at the very least, though you may want to edit additional fees individually too. For example, if you want to write off exams, you’ll enter 0 in all your exam procedure codes. If you want something charged at your UCR fee, simply delete the fee listed.
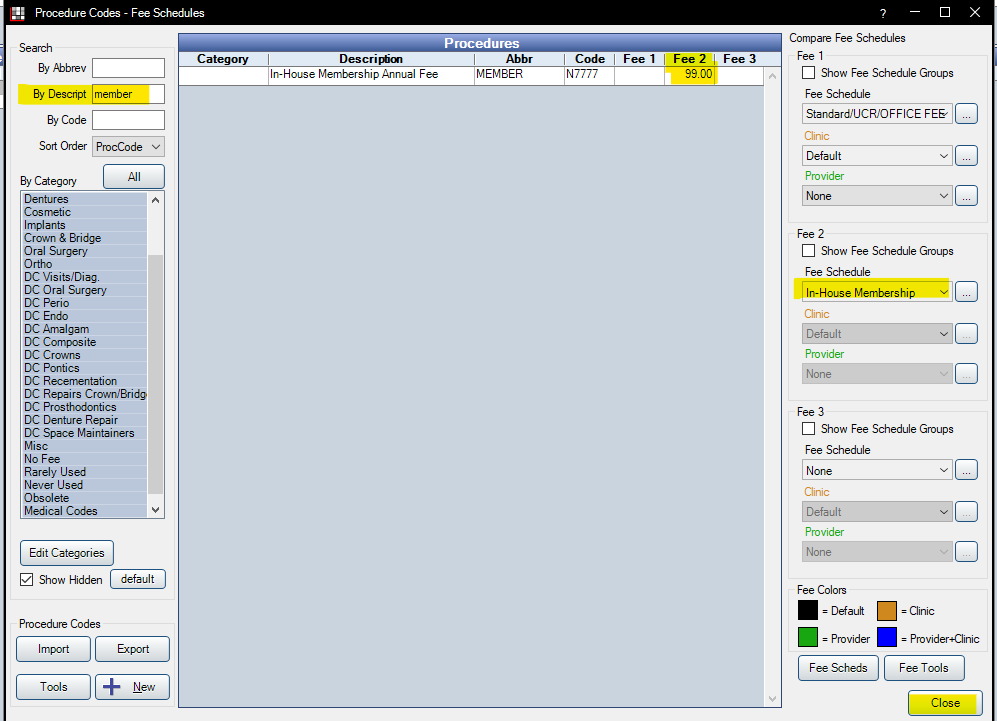
In the example above, you can see we’ve filtered by description to get our membership code to display and that we’re taking care to edit Fee 2, since the “In-House Membership” fee schedule is selected as “Fee 2” in the righthand column. You can add it to your UCR fees as well but remember that the amount will increase or decrease with mass updates in the future.
Step 5: Create a Discount Plan in Practice-Web
You’ve now done the background work for the Discount Plan and are ready to set up the plan, itself. Because patients may sign up for a Discount Plan at any point in the year, any frequencies or limitations you associate with the Discount Plan will work in a rolling year fashion based on the Effective Dates you set for each individual patient.
For example, if a patient signs up on May 1 and you set a limit of 2 Exams, the patient then has two exams covered between May 1 and April 30 of the following year. If you set an Annual Max of $1,000 and the patient signs up on November 1, the period will end on October 31 of the following year. Should the patient exhaust his benefits in January, he then has no coverage from January through October. This is similar to how most insurance plans work.
However, if you do not enter Effective Dates on individual patients, the Discount Plan will default to a calendar year, meaning benefits begin in January and end in December. That means if you set an Annual Max of $1,000 in the Discount Plan, the patient signs up in November and exhausts his benefits in December, he’ll get another $1,000 maximum to start using in January.
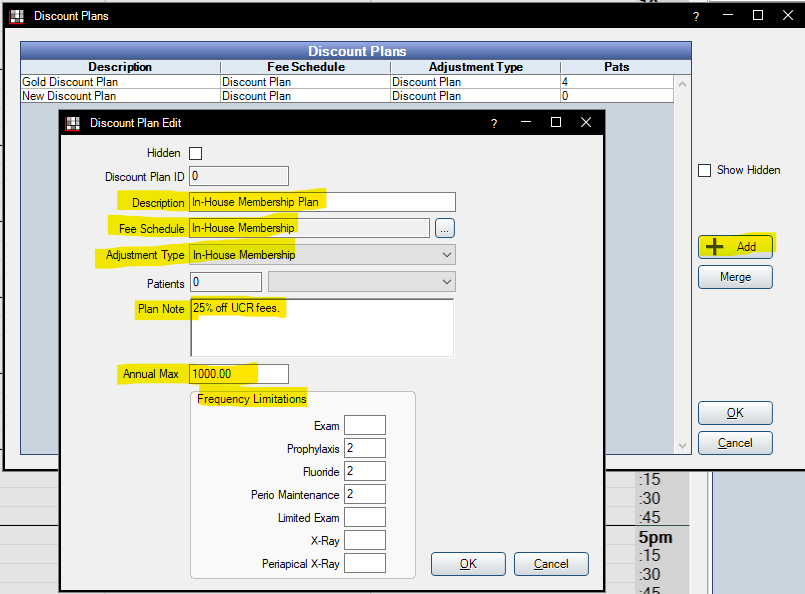
To create a Discount Plan in Practice-Web:
- Select “Lists” from the Main Menu, then choose “Discount Plans.”
- In the Discount Plans window, click “Add.”
- In the “Description” field, enter the name of your plan. In the example, we’ve named it similarly to the Fee Schedule and billing code used, so it’s easier to identify and track.
- In the “Fee Schedule” field, use the ellipses to select the Fee Schedule you just created. This ensures patients are charged according to the discounted fees you’ve determined.
- In the “Adjustment Type” dropdown, select the Adjustment Type you just created. This makes it possible for you to track the discounts given through this plan.
- In the “Plan Note” field, you can enter information that identifies specific details about the plan.
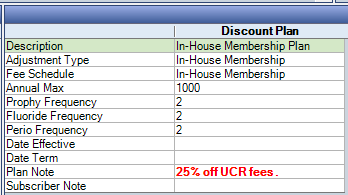
- In the “Annual Max” field, you can enter a cap on the total amount discounted for the year.
- In the “Frequency Limitations” section, you’ll enter any frequencies. In our example, we’ve opted not to cap exams or x-rays because we want to encourage patients to complete diagnostic visits so we can present more treatment plans. You can set Frequency Limitations however you wish or leave them blank and not have frequency caps.
- When you’ve filled out the Discount Plan Edit window, click “Ok” to save and close.
Step 6: Write Your Contract
To ensure patients understand what they’re signing up for and for legal purposes, guarantors should sign a contract outlining what they’re paying for and what benefits they’ll receive. The physical documentation can be managed through your Practice-Web patient forms and the sheets framework. If you have questions about what should be included, it’s best to consult an attorney.
Step 7: Create Patient Documentation/ Informational Materials
How you administer your plan is largely up to you. Some practices do not like to promote that they have an in-house discount plan to help maximize revenue. Instead, they keep informational materials at the front desk and wherever they present treatment plans, then offer the info to uninsured patients who voice concerns about payment or to all uninsured patients.
Other practices use their in-house membership plans to attract new patients. In these cases, literature is typically made available everywhere including the practice website.
A few materials you might want to create include:
- A brochure that outlines the plan and discounts.
- In-office signage for the front desk and treatment presentation areas.
- A dedicated webpage that outlines your plan or verbiage on your website that indicates you have a plan for uninsured patients.
If you’re more involved in marketing your dental practice, you may also want to consider:
- Running an email campaign that promotes your plan. Practice-Web’s pwNewsletter mass email marketing Smart Tool can help you with this.
- Including mentions of the program in your practice newsletter. pwNewsletter can help with this too.
- Running text message campaigns that promote your plan. Practice-Web’s pwConnect text message marketing Smart Tool can help with this.
- Promoting your plan on social media.
- Running paid ads to promote your discounts.
Step 8: Train Your Team
It’s important that everyone understands how your Discount Plan works and who it’s for even if they don’t directly administer the plan, present treatment, or handle any billing. Chances are a patient will, at some point, express concerns over costs to them. Although they don’t necessarily need to know how to present your membership plan to patients, they should at least have the basics down, be able to identify candidates for the plan, and be able to hand the patient off to someone who can help them with it.
Using Your In-House Discount Plan
At this point, you have an in-house membership plan, your systems are totally set up to offer it to patients, your team is trained, and you may have even started promoting it. It’s time for patients to start using it.
Step 1: Have the Guarantor Sign the Contract
In Step 6 of the previous section, you created a contract for the guarantor to sign. If you’re using Practice-Web’s online forms, you can send the document to the patient via text or email for signing on their device or have them sign it directly on your desktop in Practice-Web using a mouse or Topaz signature pad.
Step 2: Charge the Patient the Membership Fee
Most practices will use one-time annual billing for their membership plans, so our examples on this page use this model. It’s possible to set it up to add the charge to the ledger every month and then automatically charge the patient, but the process is more complicated. Contact Support if you’d like help with this.
For one-time annual charges:
- Add your annual membership procedure code to the patient’s treatment plan or Account Ledger.
- Collect payment as you normally would.
Step 3: Add the Discount Plan to the Patient
Next, you’ll add the Discount Plan to the patient as follows:
- In the Account Module with the patient selected, click “Discount Plan” from the toolbar at the top.
- Double-click the Discount Plan you want to attach to the patient. The Discount Plan Subscriber Edit window will open.
- Enter the Effective Dates and Click “Ok” to save and exit.
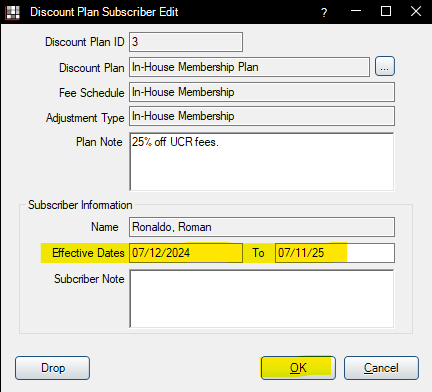
- The Discount Plan will now be attached to the patient and will display similar to the way insurance coverage does.
If you need to add notes, adjust the Effective Dates, or remove the plan from the patient, double-click the Discount Plan grid. From there, the Discount Plan Subscriber Edit window will open. You can make edits or click “Drop” to remove the plan.
Step 4: Add Treatment as Usual
From this point on, you’ll add treatment as usual. The discount will automatically be applied.

Tracking Your In-House Discount Plan in Practice-Web
From time to time, you may want to check out how your Discount Plans are performing and how many patients are using them. The information you need can be found in reports.
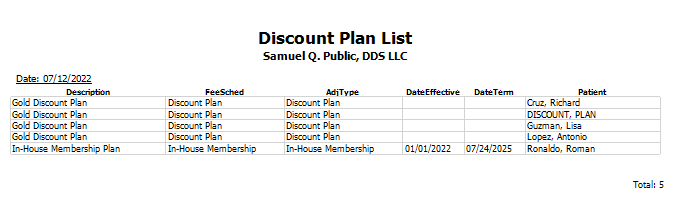
Discount Plan List Report
The default (unfiltered) Discount Plan List report provides you with:
- A full list of all patients on Discount Plans.
- The total number of patients on Discount Plans.
- The Effective Dates for each patient.
- The plan name/ description of each Discount Plan in use by patient.
- The Fee Schedule and Adjustment Type associated with each Discount Plan in use by patient.
To view or print a Discount Plan List report:
- From the Main Menu, click “Reports,” then select “Standard.”
- In the “List” section, click “Discount Plans.”
- If desired, filter by plan name, or leave blank to view all plans.
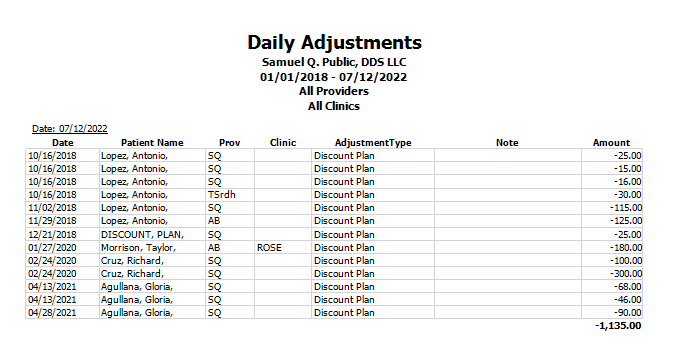
Daily Adjustments Report
The Daily Adjustments Report provides you with:
- Each discount provided by patient and date. Each procedure is discounted individually, so you will likely see multiple discounts for each patient on the same day.
- The total amount of discounts given for the selected period.
To view or print a Daily Adjustments report:
- From the Main Menu, click “Reports,” then select “Standard.”
- In the “Daily” section, click “Adjustments.”
- Choose the period you wish to view using the calendar.
- In the “Adjustment Types” section, choose the Adjustment Type you set up in the first section under Step 2. If you have multiple plans with multiple Adjustment Types, you can hold the shift key while selecting to selecting more than one option.
- If desired, you can also filter by provider and clinic.
Discount Plan Reporting FAQ
How do I view how many patients are on a specific Discount Plan?
Use the Discount Plan List as described above and filter by plan description/name.
How do I view how many patients have ever been on a specific Discount Plan?
You can use the Discount Plan List report for this too, or run the “Procedures by Procedure Code” report and search for the Discount Plan’s code.
How do I view total charges for discount plan fees?
Run the “Procedures by Procedure Code” report and search for the Discount Plan’s code.
How do I view my total write-offs for a specific Discount Plan?
For easier tracking, you should set up a unique Adjustment Type for each Discount Plan you create. That way, you can use the Daily Adjustments report to filter.
How do I view my total income from patients on a Discount Plan?
Income from discount plans is included in your Production and income reports. You can also use queries to see discount plan data. See the end of this article for details.
Get Help Setting Up Your Dental Practice Discount Plan
Discount Plans are part of the core functionality of Practice-Web, so anyone with the software can create and use them.
- If you’re not currently using Practice-Web, start with a complimentary demo.
- If you have Practice-Web Support and want assistance setting up your Discount Plan, open a Support Ticket and one of our specialists will walk you through it.
- If you don’t have Support but want assistance or want to sign up for Smart Tools, click here to renew or click here to talk to our sales department.
Query for Discount Plan Fees and Adjustments
Queries are custom reports that are typically run by advanced Practice-Web users. You can watch a quick video overview of how queries work here.
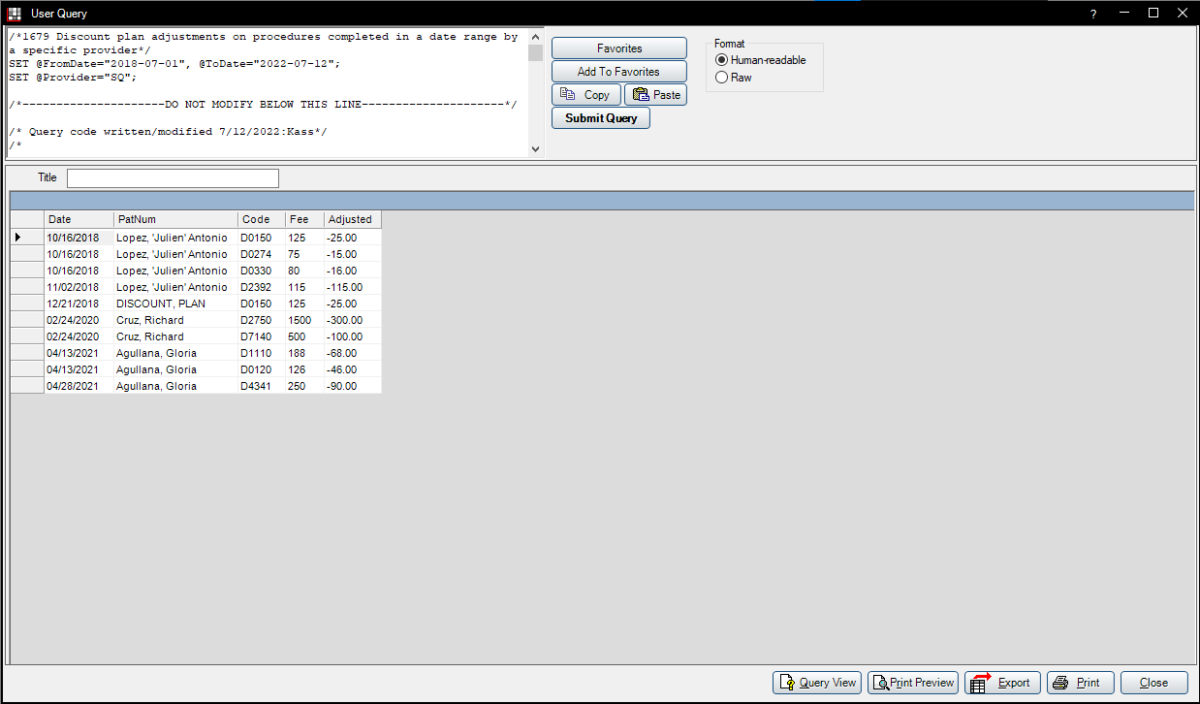
The image above shows what you’ll get with the query below. It pulls all adjustments and fees related to Discount Plans for a specific provider. You can further explore the data and run calculations by exporting it to Excel.
To use the query:
- Copy the full query highlighted below. (Highlight and press control and the letter “c.”)
- In Practice-Web’s Main Menu, hover over “Reports” then select “User Query.” The User Query Window will open.
- In the top left, you’ll have a text field. Click it and paste the query. (Press control and the letter “v.”)
- In the SET @FromDate=”2021-10-01″, @ToDate=”2021-10-31″ section, change the dates to match the dates you wish to search.
- In the SET @Provider=”Doc” section, replace “Doc” with your provider’s abbreviation.
/*Discount plan fees and adjustments on procedures completed in a date range by a specific provider*/

SET @FromDate="2022-01-01", @ToDate="2022-07-12";

SET @Provider="Doc";


/*---------------------DO NOT MODIFY BELOW THIS LINE---------------------*/


/* Query code written/modified 7/12/2022 by Kass*/


SELECT GROUP_CONCAT(provider.ProvNum) INTO @ProvNum

FROM provider

WHERE provider.abbr = @Provider;

SELECT GROUP_CONCAT(DISTINCT definition.DefNum)

INTO @DiscountAdjTypes

FROM DEFINITION

WHERE definition.Category = 1 -- adj types

	AND definition.ItemValue = "dp"; -- discount plan type

SELECT

	procedurelog.ProcDate AS 'Date',

	procedurelog.PatNum,

	procedurecode.ProcCode AS 'Code',

	procedurelog.ProcFee As 'Fee',

	FORMAT(SUM(AdjAmt), 2) AS 'Adjusted'

FROM procedurelog

INNER JOIN procedurecode

	ON procedurecode.CodeNum = procedurelog.CodeNum

INNER JOIN adjustment

	ON adjustment.ProcNum = procedurelog.ProcNum

	AND FIND_IN_SET(adjustment.AdjType, @DiscountAdjTypes)

WHERE procedurelog.ProcStatus = 2 -- Completed

	AND procedurelog.ProvNum = @ProvNum

	AND procedurelog.ProcDate BETWEEN @FromDate AND @ToDate

GROUP BY procedurelog.ProcNum
Special thanks to Amber, Geraldine, and Kass for their help putting this guide together!