How many ten-minute blocks on your schedule are empty today?
Did you know that each one represents about $2,000 per year for your practice?
Or that rotating patients between two chairs can help you gain $384,000 in annual production?
Or that you could potentially gain more than $187,000 in production each year by offering your patients the option to book online?
The strategies you’ll learn in our latest on-demand webinar “How to Schedule Like a Multimillion-Dollar Practice” can help an average dentist literally produce in excess of $20 million more over his or her career – while delivering excellent care and without burning out.
Watch the on-demand webinar here to see the strategies and setup or read the written recap below for the high points.
- Resources Mentioned in the Dental Scheduling Webinar
- Challenges of Dental Scheduling
- Step 1: Design Ideal Procedure Times
- Step 2: Know Where You’re Going/ Setting Production Goals
- Step 3: Set the Stage for Success
- Step 4: Fill Your Schedule
- Step 5: Keep Your Schedule Full
- Step 6: Track and Improve
- Build Your Multimillion-Dollar Schedule
Resources Mentioned in the Dental Scheduling Webinar
Resources mentioned in the webinar are listed below.
General Resources
- Renew Practice-Web Support
- Get a Practice-Web Demo and Free Trial Version
- Contact Practice-Web Support
Administrative Resources
- Schedule Setup (video tutorial)
- Using the Wiki Feature (user guide)
- Setting and Viewing Production Goals (user guide)
- Customizing Appointment Views (video tutorial)
- Using Blockouts (video tutorial)
- Recall and Reactivation Secrets – Ironclad Reminders (webinar replay)
Scheduling Resources
- Using Time Bars (user guide)
- Using Appointment Lists (video tutorial playlist)
- Scheduling Treatment with Year-End Benefits (webinar replay)
- Online Scheduling (webinar replay)
- Online Scheduling (product page)
- Free Trial of Online Scheduling (requires paid Practice-Web Support)
Text and Email Resources
- pwConnect Patient Texting (product page)
- pwNewsletter Mass Email Marketing (product page)
- Free Trial of pwConnect or pwNewsletter (requires paid Practice-Web Support)
Challenges of Dental Scheduling
During our live webinar, we polled the audience to determine their greatest challenges with dental scheduling. Participants were able to vote for more than one issue. The results:
- Filling the Schedule (43%)
- Keeping the Schedule Full (43%)
- Setting Production Goals (29%)
- Generating Consistent Production (29%)
- Always Running Behind (14%)
- Getting Certain Patients (Crown, SCRP, New Patients, Limiteds, etc.) Seen Quickly (14%)
Scheduling Impacts Morale and Patient Care
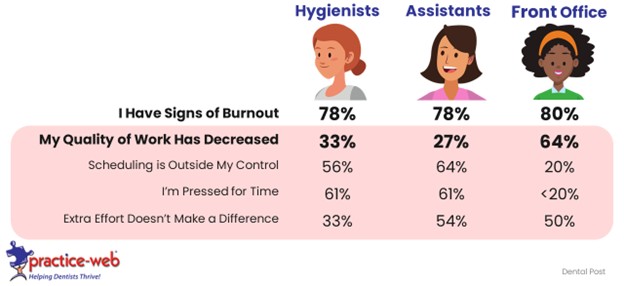
Dental professionals report high levels of burnout and anywhere from 33-64% say the quality of their work has declined per Dental Post surveys. Interestingly, the reasons they commonly cite for the decline are directly tied to scheduling:
- Scheduling is Outside My Control
- I’m Pressed for Time
- Extra Effort Doesn’t Make a Difference
Similar sentiments are shared by office managers and dentists.
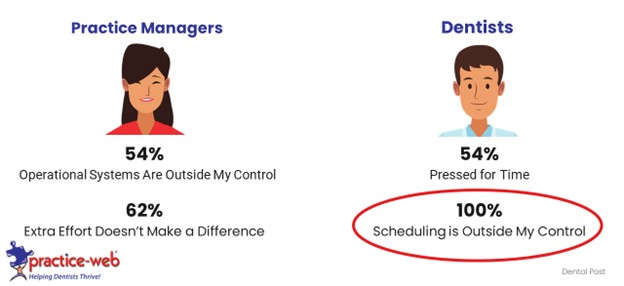
But perhaps what’s most important here is that managers feel operational systems (which include scheduling policies) are outside of their control and that 100% of dentists who report the quality of their work has declined say that scheduling being outside their control is a contributing factor.
In other words, scheduling is impacting the day-to-day operations of practices and leading to reduced quality of care, and most dental professionals regardless of role feel fixing the problem is outside their control. You can fix it. The strategies outlined in this webinar teach you how.
Dental Scheduling Impacts Patient Happiness
As reported by dental professionals, quality of care is impacted by scheduling, indirectly impacting patient happiness in this manner. However, long waits caused by scheduling issues directly impact patient satisfaction. Overall, 30% of patients have walked out of an appointment because of long waits and 20% have considered changing providers after sitting in the waiting room past their scheduled time. Nearly two-thirds have skipped a visit due to the hassle of scheduling alone.
Step 1: Design Ideal Procedure Times
Before you start booking appointments, it’s essential to know how much time each procedure really takes and set up your scheduling software to align with real-world timing.
Schedule with Ten-Minute Increments
Many practices use 15-minute increments on their schedule and to determine appointment lengths. Switching to ten-minute increments can give your office an extra seven days of production per year per Dental Economics research, which amounts to $25,000-$48,000 in additional production for a typical solo dentist. In Practice-Web, you’ll do this in Appointment Views.
Conduct a Time Study
Time all your procedures for a few days to a week, making note of who is in the room during which parts of the appointment. Log the procedures as they’re performed. For example, if the dentist is performing two posterior composite fillings, they should be logged together as a block versus logging the time for individual fillings. You’ll want to capture at least ten of each appointment type, then calculate the average.
Be as accurate as possible with this. If you’re working faster than normal because you know you’re being timed or you shave off time, you’ll wind up with an overfilled schedule later. If you pad times, you’ll wind up with too much downtime during the day that would be better spent caring for patients. Don’t worry about getting locked into specific procedure times forever. Your times are going to change, so a study should be performed every 6-12 months.
If the whole team is working together to manage your time study, use your Practice-Web Wiki for collaboration and tracking.
Set Up Procedure Times to Match
Most modern dental scheduling software will automatically set the length of an appointment based on the procedures in it. You’ll have times automatically set in Practice-Web too, but you can, and should, adjust them to match the results of your time study. This is done via Lists in the main menu, then choosing Procedures, and selecting the procedure you wish to edit.
Use Appointment Types as Needed
Procedure times as covered above are helpful when the dentist is only performing one procedure, but it’s common to group multiple procedures into one appointment. In these cases, you can make Appointment Types. This is done via Setup in the main menu, then selecting Appointment Types.
For example, let’s say a single crown takes 90 minutes. It doesn’t take three hours to do two at once. It might be more like 2-2.5 hours. You can create an Appointment Type for two crowns and set the time accordingly.
Note that Appointment Types can also have a designated color in Practice-Web, meaning that it overrides the default color if an Appointment Type is selected when scheduling. Some practices like to change the default color to something that stands out for their high-end procedures. It makes it easier to gauge whether you’re on track to meet production goals for the day without even looking at the numbers or procedures.
Step 2: Know Where You’re Going/ Setting Production Goals
The next step is to determine what production goals your practice should be targeting. This is going to be different for every practice, so we’ll provide a few methods and guidelines that can help you determine what your production goals should be.
Ultimately, you’ll want to break your figure down to an hourly production goal. This will help when you’re adding goals to your software later. Practice-Web, for example, is dynamic. It understands how many hours a provider is scheduled, so it adjusts goals according to your view or period based on the hourly figure you select.
Goalsetting Method 1: Use Historic Figures
If you have historic figures, you can use these as your baseline and increase them by a certain percentage to set goals for the upcoming year. Prior to the pandemic, the average practice increased production by two percent annually. Because you’re in the process of structuring your schedule for success, your results will ideally be better than average. This is a good time to stretch!
Have a discussion with the team to see what you can reasonably achieve and what roadblocks you might face. For example, if a large competitor with a massive marketing budget just opened next door, it may be harder to hit your mark unless you invest in marketing too.
To get your historic figures from Practice-Web, use the Monthly Production Goal report in Standard Reports.
Goalsetting Method 2: Use Industry Benchmarks
If you don’t have historic figures or you want to focus more on where you think you should be rather than where you’ve been, use industry benchmarks. Our figures come from MGE Management Experts and come with a few caveats:
- These are practices that mostly accept PPOs with only a few HMO plans. If you accept more HMO plans, your figures will be lower.
- These are general dentists. Specialists will generally earn more, but there’s a wide variance depending on specialty, so figures for specialists aren’t covered.
- Associates will produce 25-30% less than owner dentists. This is because owner dentists usually work faster due to their experience and they tend to take on the more complicated cases, while the associate covers more bread-and-butter procedures like fillings and crowns.
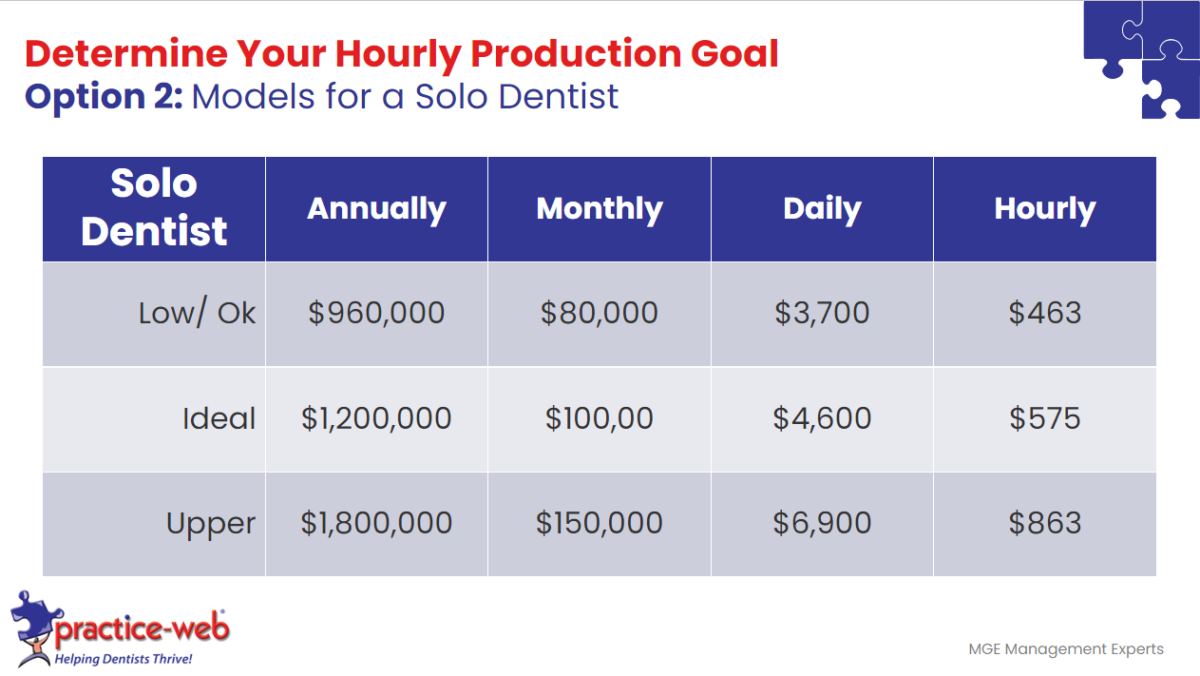
Solo Dentist Low/Ok Production – $463 per Hour/ $960,000 Annually
If you’re a newer dentist or are happy running a bread-and-butter practice that doesn’t involve large cases like implants and rarely do endo, you can operate profitably bringing in $463 per hour.
Solo Dentist Ideal Production – $575 per Hour/ $1,200,000 Annually
Dentists operating efficiently who handle more complicated cases and do more quadrant dentistry as opposed to single-tooth dentistry can produce around $575 per hour. This works out to collections of around $150,000 annually when you add in one or two hygienists.
Solo Dentist Upper-Tier Production – $863 per Hour/ $1,800,000 Annually
If you’re absolutely hopping all day or do more high-end procedures, you can produce around $863 per hour. Solo dentists can’t usually sustain this on their own for an extended period. If you’re around this mark, it may be time to start thinking about bringing on an associate.
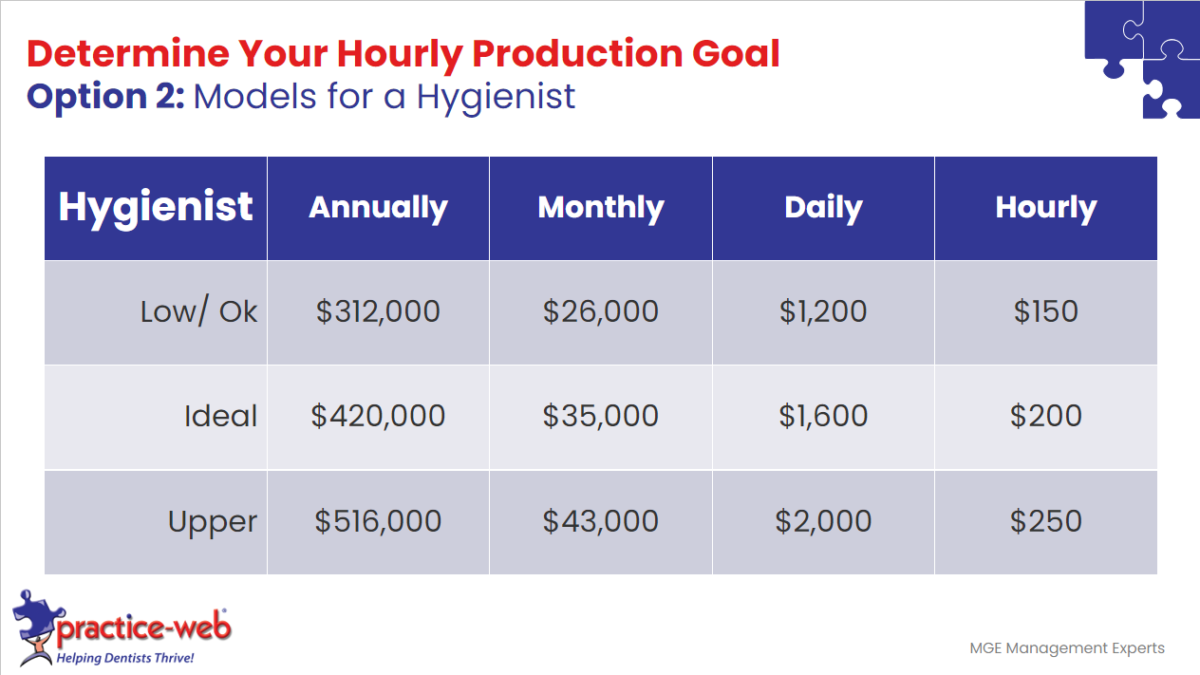
Hygienist Low-Ideal Production – $150-200 per Hour/ $312,000-$420,000 Annually
In a typical practice that mostly accepts PPOs, hygienists will usually produce somewhere between $150-200 per hour.
Hygienist Upper-Tier Production – $250 per Hour/ $516,000 Annually
Sometimes hygienists can produce in the neighborhood of $250 per hour. You’re probably only going to see this level of production if your practice is cash-only or if you use an alternative scheduling method.
For example, some offices use the assisted hygiene model. The hygienist has two chairs and patients are staggered/ dovetailed throughout the day. An assistant does everything allowed by law (varies by state), such as seating the patient, taking x-rays, and sitting in for the exam while the hygienist is with another patient. When the hygienist finishes with the cleaning next door, the two switch rooms. The assistant polishes (if legally allowed), dismisses the patient, and preps for the next patient.
Data Sharing Helps Practices Reach Their Goals
A decade ago, only 24% of employers shared financial data with their employers per Robert Half research. Nowadays, nearly 90% do. The sentiments were echoed in our own survey conducted during the live webinar – 89% of dental practices now share production goals and results with their teams at least some of the time. More than half share figures all the time.
If you’re not presently sharing production goals and results, it’s worth your while to do so. Research shows it can boost revenue by 1-2% and that organizations that share outperform their peers on all business metrics.
Add Your Production Goals to Your Dental Scheduling Software
At the very least, adding your goals to your dental scheduling software keeps production top-of-mind. If you add them to Practice-Web, it also helps take the guesswork out of where you stand in relation to your goals.
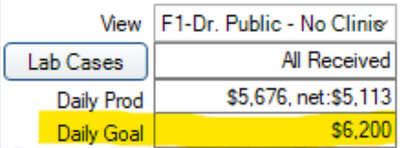
Again, production goals in Practice-Web are dynamic, so if you’re looking at your schedule and have a View with all providers, you’ll see the goal for all providers on the schedule and how close you are to meeting your overall goal for the day based on all visible patients/ appointments/ procedures in appointments. If you switch to a view with just the dentist, the goals and scheduled production figures will shift and only show his or her numbers.
Making this function properly in Practice-Web is a three-step process.
Step 1: Set Up Your Schedule
First, you need to tell the system what days and hours each provider works. You do this in the schedule setup. In doing this, the system will know how many hours to multiply the hourly goal by and will automatically calculate goal goals for any range via reports or by day if you’re looking at the schedule.
Step 2: Add the Hourly Production Goal to Each Provider
Then, go to the provider’s settings and add the production goal you chose earlier to the hourly production goal box.
Step 3: Create Appointment Views
Appointment Views allow you to choose what displays when you view the Appointment Module in Practice-Web. Many practices don’t use views or only use them to create views of the schedule that hide sensitive information like last names on computers that could potentially be viewed by third parties.
In this case, you’ll want to create views that allow you to isolate production in a way that’s meaningful to your office. For example, you may want to be able to see just the doctor’s schedule and production or just production for hygiene.
To set up Appointment Views, choose Setup in the main menu, then Appointments, and Appointment Views.
Categorize Procedures Based on Value
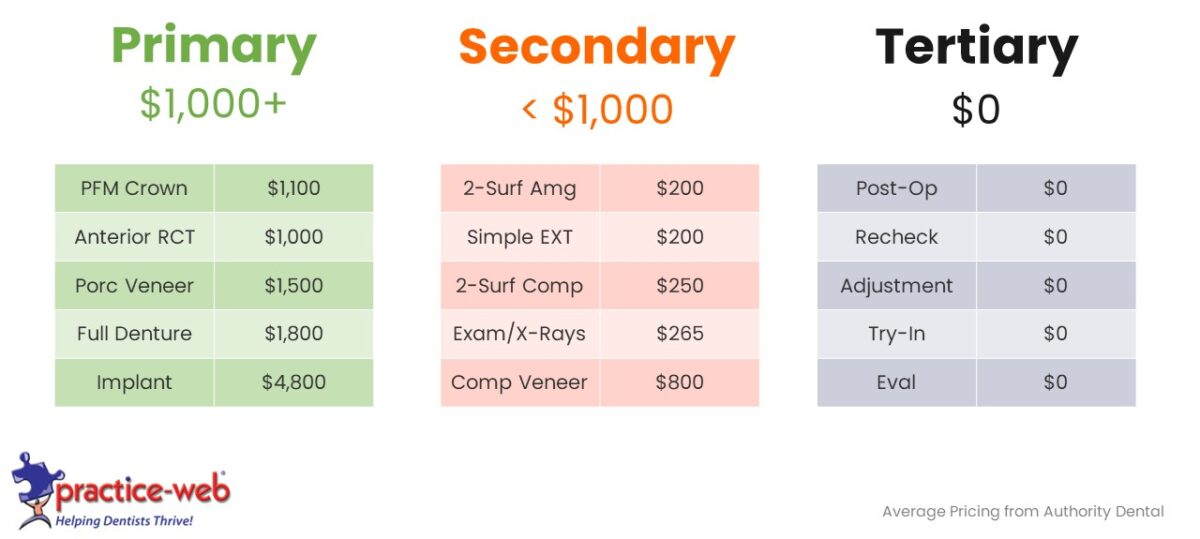
Have a tiered mindset when it comes to procedures and production goals. It will help you identify what types of procedures you need in order to reach your goals, and how many of each, later. The simplest way to do this is to break procedures into three groups.
- Primary: Any procedure with a fee higher than $1,000 is considered primary. Your fees may be different than what’s shown here, as we’re using national averages. However, in most cases, primary procedures will include things like PFMs, root canals, veneers, dentures, and implants.
- Secondary: Any procedure with a fee under $1,000 is considered primary. This usually includes things like composite and amalgam fillings, exams, and chairside/ composite veneers.
- Tertiary: Any procedure that does not have an individual fee or has a fee of $0 is considered tertiary. This includes things like post-op checks, adjustments, and try-ins.
Calculate Ways to Reach Your Goal
The easiest way to ensure you’re reaching your goals is to look at each day independently and identify the best mix of treatment that will put you at your goal.
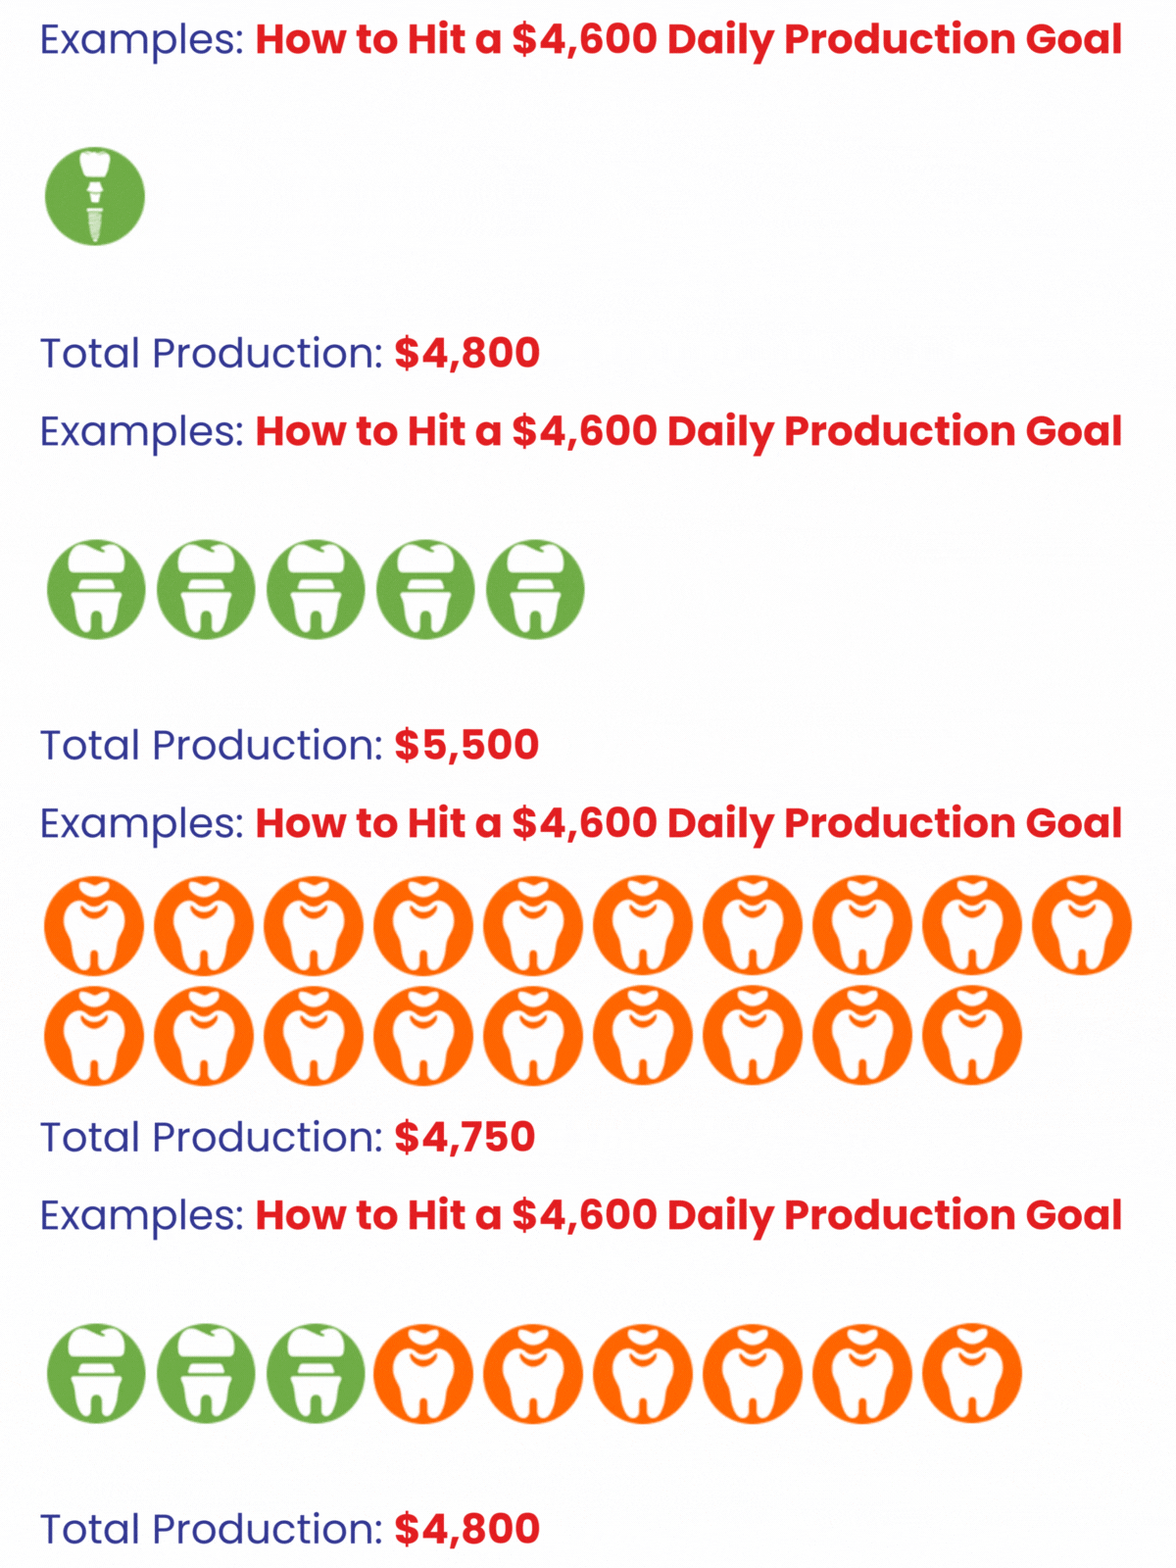
For example, if you’re targeting $4,600 daily production (the “ideal” goal from earlier), you can meet it in a multitude of ways.
- 1 Dental Implant = $4,800
- 5 PFMs = $5,500
- 19 Two-Surface Composites = $4,750
- 3 PFMs + 6 Two-Surface Composites = $4,800
While many dentists might like to do an implant every day, it’s not possible in every market and typically requires intensive marketing. The same is true of five PFMs daily. The goal can also be reached by doing 19 fillings. In many practices, the number of patients needed to reach the goal would make it very difficult and create a hectic day. Therefore, the better mix for most practices would likely be three PFMs and six fillings. We can translate this to two or three primary procedures and five or six secondary procedures per day.
There is no wrong or right here, though. The important thing is that you understand how these groupings impact your production and identify which mix will not only get you to your goal, but feel manageable for you and your team.
Step 3: Set the Stage for Success
Next, you’ll create templates in your dental scheduling software and address any administrative concerns. That way, you won’t actually have to think about production each time you schedule an appointment. You’ll have your ideal day every day because your processes make it happen.
Switch to Ten-Minute Increments in Your Dental Scheduling Software
If you haven’t done so already, make sure you’re using 10-minute increments in your dental scheduling software. You’ll book more efficiently this way and can generate an extra seven days of production annually. In Practice-Web, you set time increments in Appointment Views.
Identify 70-75% of Your Daily Production Needs
While you can template out your full day, it’s overkill in most situations and doesn’t lend itself well to flexibility. Instead, ensure you’re saving dedicated time for 70-75% of your daily production time each day. If your goal is $4,600 per day, then you’ll need to set aside time for $3,200-$3,450 in production each day.
That coincides with the model we used earlier too. Three PFMs (primary procedures) and six fillings (secondary procedures) brought us to our goal. In this example, three PFMs (each with a fee of $1,100) is $3,300. In blocking out space for just those three primary procedures each day, we block out 71% of our production goal.
Design Your Ideal Day
In this step, you’re creating potential templates or concepts about how you’d like your ideal day structured.
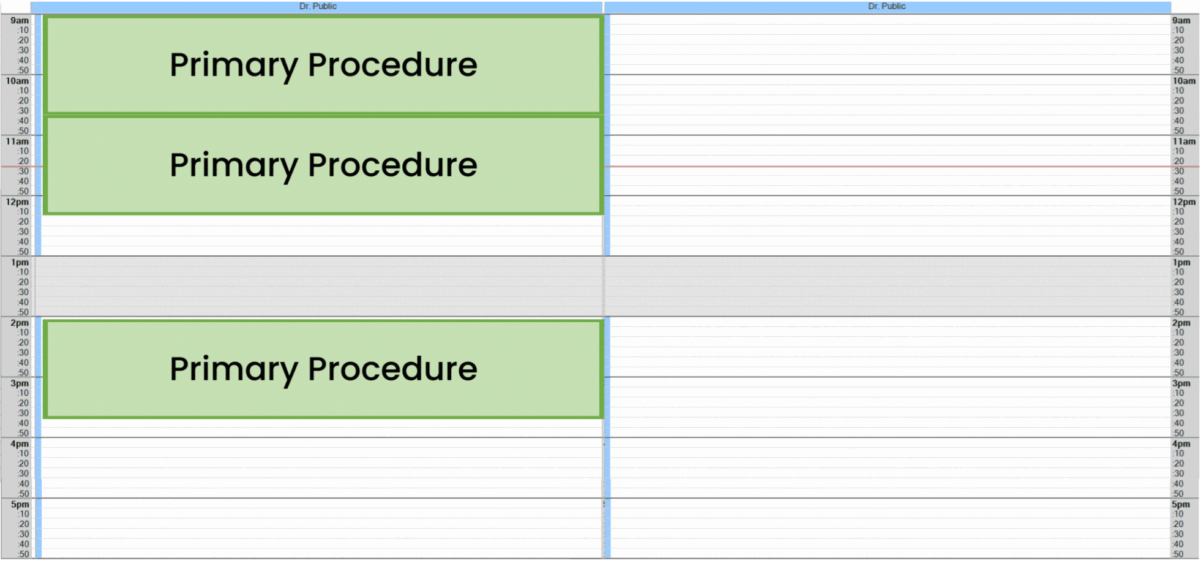
We’re treating our primary procedures as 90-minute appointments for crowns because that’s what they’ll likely be in our sample practice. The three blocks can go anywhere on the schedule we want. A few things to keep in mind when templating:
- Consider keeping blockouts in spots that are harder to fill. For example, if you know your mornings fill up easily, you may want to only template afternoon appointments.
- Block when the doctor works best. Some dentists don’t like to do complex procedures first thing in the morning, at the end of the day, or even right before lunch. The dentist should feel like they’re following their natural rhythm.
- Stagger between at least two chairs/ operatories. Again, rotating between two chairs is worth a 30-40% production boost. Each one should have its own assistant.
- Know what assistants can handle. In some of our examples above, the primary procedure blockouts overlap at the start or end. That’s because the assistant is always seating the patient at the start and is often creating and seating the temporary crown at the end. Only include overlaps when your assistants are trained in expanded functions and can legally perform them
- Be aware of the pace at which your team works best. Some teams feel energized when primary procedures are grouped together, while others may feel drained. Structure the day in a way that feels manageable to everyone.
- Days can be different. If your team, hours worked, and other factors shift from day to day, you may want to create a few different templates.
This step doesn’t have to be digital. For example, you can use a design program and simply move the blocks around digitally or draw it out on paper and have cutouts represent your procedure blocks. Experiment with a few different “ideal day” layouts and get feedback from the team before moving forward.
Template Your Ideal Day in Your Scheduling Software with Blockouts
Once you’re set on how you want your day to flow, you’ll build your templates in your scheduling software. This is done with the blockout feature in Practice-Web. This makes scheduling simple because it ensures you don’t overfill a day with secondary procedures that don’t get you to your goals or leave odd gaps that make it impossible to add longer procedures that boost production.
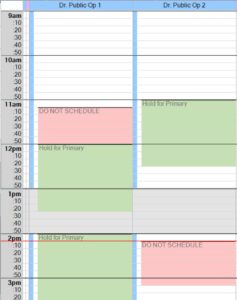
In this example, we:
- Added three primary procedure blockouts to represent 72% of our production goal.
- Placed blocks in the middle of the day because those spaces are usually harder to fill.
- Made the primary blockouts green, so it’s easy to identify open spaces for those procedures when we’re scheduling.
- Added “Do not schedule” blocks at times when we know the dentist will be busy in the room next door. These can be overridden if someone needs time with an assistant, such as for whitening or recementing a temporary, but we don’t want anyone double-booking the doctor during those times.
- Overlapped appointments when we knew the assistant would only be needed in one operatory.
- Booked the end of the primary procedure during the dentist’s lunch. The assistant in op 1 will be creating the temporary crown at that time and the dentist won’t be needed, so it’s an easy way to keep the day as productive as possible. If the assistant needs a 60-minute lunch rather than the 30 minutes available, we’d simply flip the blackouts in op 1 and op 2 at 2pm to ensure she gets a full break.
Copy Day and Copy Week
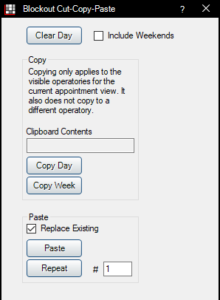
If all your days will use the same template, you can use the Copy Day feature to automatically duplicate it across the week, then use the Copy Week feature to duplicate the week. If your days will have different templates, create a unique template for each day, then duplicate the full week. In either case, you can template your schedule weeks, months, or years in advance very quickly.
Block Out Time for Other Essential or Lengthy Appointments
If patients have to wait for certain appointment types, like scaling and root planning or new patient appointments due to limited availability or insufficient time, you may want to create blockouts for them as well.
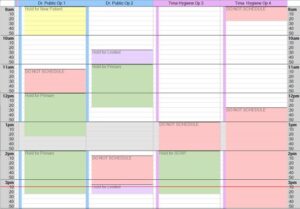
In this example:
- In addition to our primary blocks, we now have a new patient appointment block at the start of the day on the doctor’s side. We did this because, in our sample practice, we know our new patients want an appointment first thing in the morning and we want to accommodate them to help our practice grow. If your new patients can’t get appointments within a couple of days of calling, it’s a good idea to add new patient blockouts. If new patients often decide not to schedule because they can’t get their preferred time, consider adding blockouts in the coveted spots to reserve the space in advance.
- We’ve also added blockouts for limited exams. This ensures patients with emergencies can be seen right away without overloading our schedule or causing delays.
- On the hygiene side, we’re doing assisted hygiene in the morning, so the first 30 minutes are blocked out in op 4 to allow for proper staggering.
- Whereas the doctor’s ops stayed open at lunch in case there are appts an assistant can take, the hygienist is blocked out completely.
- After lunch, op 4 is closed off because the hygienist will ideally be doing SCRP. If it doesn’t fill, we can always book perio maintenance in the afternoon since it’s more demanding than prophies that are easier to dovetail or revert the afternoon schedule to prophies and stagger them again as we did in the morning.
Keep Operatories Open for Production with Teledentistry
Sometimes patients don’t really need to be seen in the office. For example, maybe you provide complimentary smile consultations or second opinions if the patient already has x-rays. Or, maybe you already know the patient has a raging infection and what tooth it’s on, but your state requires that you make visual contact with them before prescribing antibiotics. Teledentistry is great in these situations and can keep your physical operatories open for appointments that boost production.
Because most video conferencing tools are not HIPAA-compliant, it’s important to have specialized Teledentistry software for these visits. pwTeledentist, the Practice-Web solution, is incredibly affordable, works without any special downloads or extra apps, and automatically saves a copy of the session for you with a link in the patient’s chart.
Prepare Administratively
There are a few things you can do administratively before launching your new scheduling program to ease the transition and prime your office for success.
Maintain Lists
Start using Practice-Web’s native Appointment Lists, such as the ASAP List, and leverage Planned Appointments. These will make it easier to fill your schedule if you have gaps or cancellations.
Have a Written Internal Scheduling Policy
Include things like the cancellation policy, if patients with a history of cancellations shouldn’t be allowed to take prime spots, and if/when a fee is charged or waived for last-minute cancellations. Also, make note of when blockouts can be filled with alternate appointments. For example, some offices will block out time for primary procedures, but then allow secondary procedures to be scheduled if the block is still open 24-48 hours prior to the appointment time.
This is another great place to use the Practice-Web Wiki because the whole team can access the document as needed.
Put One Person in Charge of Scheduling, But Train Everyone
Everyone who might need to schedule should receive training on your policies and learn how your scheduling systems work. However, one person should be ultimately responsible for keeping an eye on the schedule and ensuring that it’s being managed in a way that helps you meet your goals.
Step 4: Fill Your Schedule
Next, let’s go over how to fill your schedule in a way that keeps production levels high without overwhelming the team.
Use Time Bars to Confirm Provider Availability
Earlier, we talked about the importance of scheduling providers and setting up the schedule so that it knows when providers are working and also covered how to designate assistant and provider time in appointments by toggling between / and X in procedure setup and appointment types.
With these measures in place, your schedule can also intelligently tell you If a provider is available or booked.
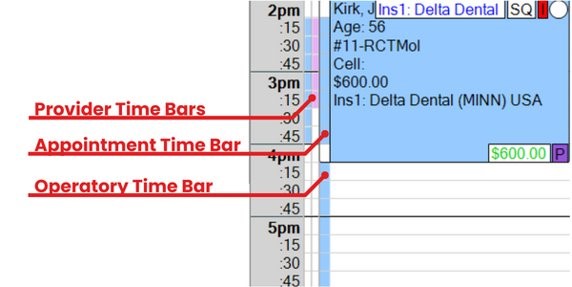
In the example above, you can see the operatory time bar. It’s the wider blue bar next to the times on the schedule where there is no appointment. Because it’s blue, the dentist’s color, we know that the dentist can be scheduled there.
If you follow the line upward to where the appointment is, you’ll see the appointment time bar. The blue designates where an X was in the setup for the procedure, meaning the dentist will be in the operatory during that part of the appointment. The white designates where the / was, meaning the assistant will be in the room and the dentist is not needed.
Closest to the time markings, there are narrower provider time bars. The blue ones signify that the dentist is scheduled to be in an operatory at that time. The pink ones signify that the hygienist is scheduled in an operatory.
In the bottom example, you can see the provider’s time bar now has hash marks in it. That’s because he’s scheduled to be with patients in op 1 and op 2 at the same time. It’s a warning that he’s probably overbooked if you’re using the tools correctly. If it was black, it would mean he was scheduled to be in three places at once. Yikes!

Tools like time bars are incredibly helpful for schedulers who might not otherwise know when a provider can be double-booked. They don’t even need to understand the procedure or what’s happening in the back office to see that this schedule is probably going to create chaos. It’s also useful for anyone who wants to understand the flow of the day at a glance, without stopping to read procedures.
Reframe Your Language
Simply changing the way you talk to patients about appointment availability can make it easier to fill your schedule sensibly versus leaving gaps everywhere in an effort to cater to patients. For example, try saying:
“How does tomorrow at 1 or Thursday at 10 sound?”
This approach is better than “When do you want to come in?” because you’re leading with the spots you need to fill, so you’re more likely to fill them.
“Will the same day and time six months from now work for you?”
This approach is similar but would be used when the patient is at the office for a prophy and is scheduling the next visit before leaving. When you use leading language like this, the patient will generally follow with a “yes.” Because pre-appointment rates are linked to practice production, it’s essential to get as many patients as possible to book their next visit while they’re in the office.
“We book so far in advance, and I’d hate for you to have trouble getting in. Let’s find a spot for you now and we can move it later if it doesn’t work – just give us a couple of days’ notice.”
If the patient hesitates or says they can’t commit, a gentle explanation of how booking now benefits them is usually enough to get them on the schedule. Adding a mention of the cancellation policy also sets their mind at ease while reaffirming the need to keep appointments. Most patients will keep the appointment once it’s scheduled, so this approach should not impact last-minute cancellations later.
Automate Recall Reminders
You can automate recall reminders with a tool like pwConnect, the Practice-Web patient texting service.
Perform Follow-Ups
Make sure you’re reaching out to patients with overdue recalls on a regular basis.
- 1-6 Months Overdue = Monthly
- 6-12 Months Overdue = Every 2 Months
- 12-18 Months Overdue = Every 3 Months
- 18+ Months Overdue = Final Reminder That They’re About to Be Inactivated
Reach out to people periodically to fill your schedule too.
- Planned Tracker (Appointment List) = Monthly
- Unscheduled (Appointment List) = Monthly
- Treatment Plan Manager (Report) = On-Demand; Year-End or New-Year Benefit Reminders and Promotions
Again, if you’re using Practice-Web, all these lists and reports work with pwConnect, so you can send out a message to all patients in seconds.
Fill Your Schedule Automatically with Online Scheduling
More than 75% of patients prefer to schedule online and, overall, 60% of appointments are booked online. However, just 15% of dental appointments are scheduled online today. This is because most practices simply don’t offer it to patients, so those that do have a major competitive advantage over competing practices. In fact, if all other details about two providers were similar, 44% of patients say they’d choose a dentist based purely on the ability to schedule online.
By allowing patients to self-appoint, you’ll boost patient happiness, save time, and fill your schedule easier. Practice-Web’s Online Scheduling program integrates seamlessly with the software, so patients who book online are automatically added to your schedule and fall into your natural workflows for things like reminders.
You can share your online booking link via:
- Email
- Monthly or Bi-Weekly Newsletters
- Monthly or Bi-Weekly Promos
- Recall Due Reminders
- Text Message
- Monthly or Bi-Weekly Promos
- Recall Due Reminders
- ASAP List Contacts
- Planned Treatment List Every 2-4 Weeks
- Year-End Benefit Utilization Reminders
- Social Media
- Your Website
- Review Sites
- Google
- And More
Step 5: Keep Your Schedule Full
Around 10% of appointments will become no-shows or last-minute cancellations. Take steps to minimize them and be prepared to fill vacancies as they open.
Have a Robust Reminder Strategy
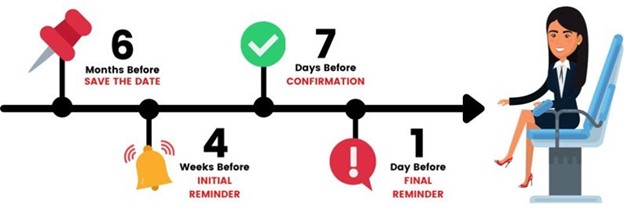
Automate your reminders and reinforce the value of keeping appointments with messages that use phrases like “We’ve reserved time just for you…” This will help keep cancellations to a minimum.
Customize your reminder strategy to suit the needs of your practice and the behavior of your patients. A sample schedule of reminders leading up to a hygiene appointment might be:
- 6 Months Before: Save the Date
- 4 Weeks Before: Initial Reminder
- 7 Days Before: Confirmation
- 1 Day Before: Final Reminder
Use the ASAP List to Fill On-Demand
Keep a running list of patients who want sooner appointments, so you can contact them as spots become available. In Practice-Web, the native tool for this is the ASAP List.
Host a Morning Huddle
Discuss who can fill gaps, such as:
- Patients scheduled on the doctor’s side who need hygiene appointments.
- Patients on the hygiene side who need treatment.
- Family members of patients already coming in who need hygiene appointments or treatment.
Discuss potential issues such as:
- Patients who might no-show or cancel.
- Appointments that might run long.
- Appointments that might be quick and can potentially be double-booked.
- Times an assistant or hygienist might need an extra hand and who is available to help.
Step 6: Track and Improve
Because your schedule is the heart of your practice, it’s important to keep an eye on it and ensure it’s performing at its best.
Monitor Production in Real-Time
Watch your production and production goals on the schedule using Appointment Views to ensure you’re meeting targets on a daily basis.
Track with Reports
Pull your production reports at least once a month to ensure you’re meeting targets.
Reevaluate Every 6-12 Months
When you’re first starting out, it’s a good idea to perform a time study, check your production, and reevaluate your goals and processes every six months. The more experience you gain, and the longer your team works together, the more efficient you’ll become. It’s ok to do audits annually once you’re operating at peak performance.
During your audit, assess if you’re:
- Meeting Goals: If you’re meeting your goals, consider increasing them.
- Missing Goals: Find out why and try to correct any issues. For example, you may need to change your ideal treatment mix, invest more time in filling scheduling gaps, or explore if inefficient clinical workflows are making your appointments take too long. Lack of resources, such as an insufficient number of patients, being short-staffed, and not leveraging multiple chairs can be issues too.
- Working Faster: If your time study reveals that you’re working faster, shorten procedure times or appointment type lengths accordingly.
Build Your Multimillion-Dollar Schedule
Our team is happy to train you on the Practice-Web features outlined here and help you get them set up. If you’re not already signed up for Support, renew here first. Get contact info or open a ticket on our Support page.
Not using Practice-Web yet? These features are only the tip of the iceberg. Our software is loaded with features and tools to help your office run more efficiently, boost production, and increase profit. Request a free demo to learn more.

