
Millions of dental patients leave money in the form of unused insurance benefits on the table each year. Surprisingly, only 2.8% of patients with a PPO dental plan use their full annual benefits before they expire. This means the majority of patients lose out on valuable preventative care and other treatments that could save them from more costly procedures later on.
Additionally, many patients have Flexible Spending Accounts (FSAs) which also expire at the end of the year, making it crucial to use these funds before they disappear.
Year-end dental marketing is essential for practices like yours to ensure that patients are aware of these looming deadlines. The end of the year is often a busy time, and your patients may forget about their benefits. By communicating with them now, your practice can help patients maximize their insurance plans while boosting your own year-end revenue.
Educating patients on the importance of utilizing their remaining benefits not only helps them avoid wasting their hard-earned dollars, but also ensures they maintain optimal oral health heading into the new year.
Here’s how to leverage the Practice-Web’s Treatment Finder, Treatment Plan Manager, and marketing features like pwNewsletter and pwConnect to boost year-end appointments and revenue.
Find Patients with Expiring Benefits Using the Treatment Finder
The Treatment Finder in Practice-Web helps you identify and generate a list of patients who have remaining insurance benefits but no scheduled appointments. You can filter by insurance benefit year, remaining insurance amounts, treatment plan dates, and more to narrow down patients who could benefit from using their expiring coverage. This report can remain open while navigating between different modules, making it a seamless part of your workflow.
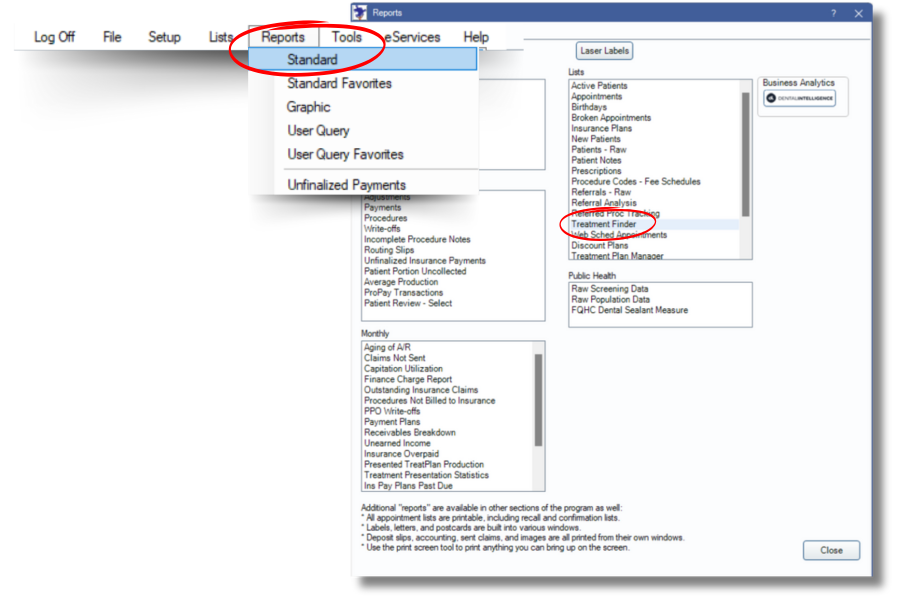
To locate the Treatment Finder Report, navigate to your main menu in Practice-Web and click on Reports > Standard. In the lists section on the right-hand side of the screen, locate and select “Treatment Finder.”
Choose different criteria settings to identify patients who may need a range of treatments, or a specific treatment completed before the end of the year.
You can filter by:
- Ins Month Start – based on when the patients insurance benefit year begins
- Amount Remaining Over – to include only patients who have insurance benefits remaining over the specified amount.
- TP Date From – to only include patients with procedures with treatment planned on or after this date.
- TP Date To – to include patients with procedures with treatment planned on or before this date.
- Providers – to filter by different providers in your office if one of them has many chairs to fill. This filters by the patient’s primary provider by default.
- Billing Type – to select patients based on specific billing types such as insured or uninsured.
- Use Treating Provider – to filter by provider assigned to certain procedures.
- Assume Procedures Are General – check this box to assume all procedures for a patient apply towards their annual max.
- Include Secondary Insurance and No Insurance – this includes patients with secondary insurance and patients who have no insurance. If this box is checked, the Ins Month Start criteria will be ignored.
- Include Patients with Upcoming Appointments – check this box if you want to include patients who have a scheduled appointment in the future. Planned appointments are not included.
- Code Range – you can enter procedure code or a range of codes here to filter results to only include patients who have specific planned procedures.

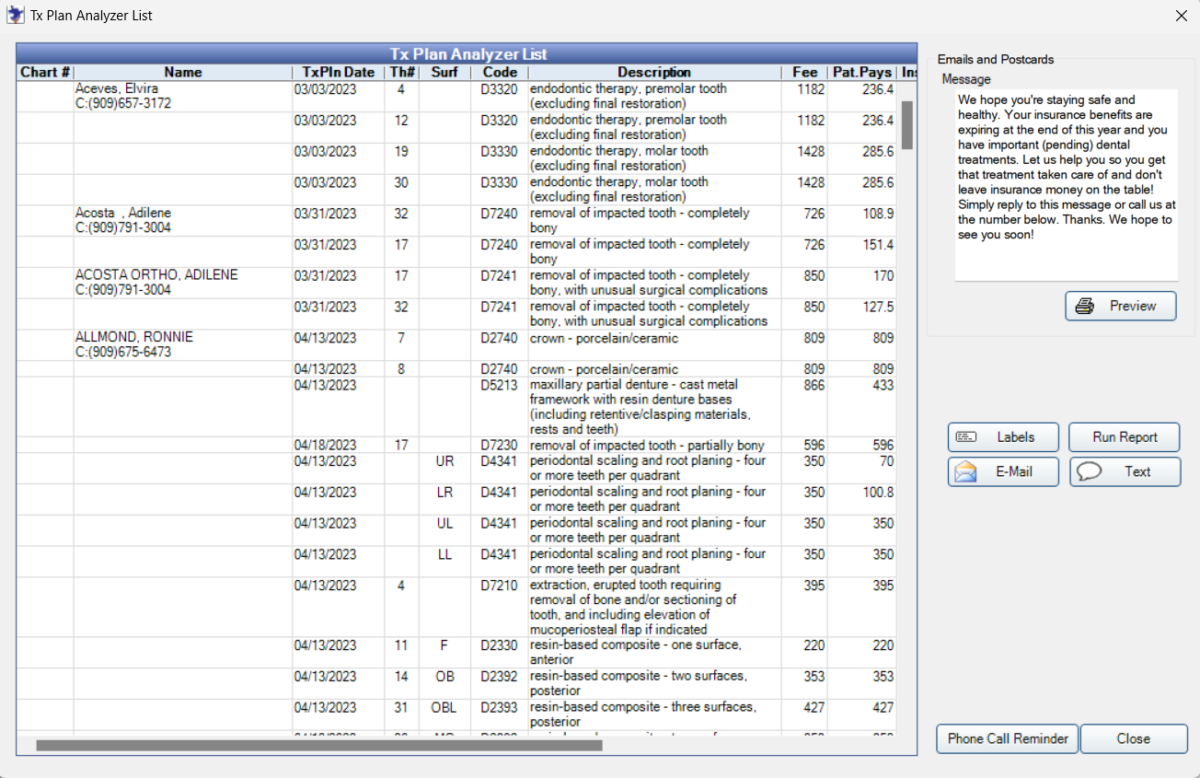
Once you’ve generated your list, you can use the options at the bottom of the Treatment Finder window to contact your patients such as mail them a letter, text them, export the file for emails, print the list for someone to call at a later date, and more.
Prioritize Care with the Treatment Plan Manager
Once you have identified patients using the Treatment Finder, the Treatment Plan Manager allows you to assess their planned procedures. This tool enables you to review patients’ treatment plans, organize them by urgency or insurance benefits, and prioritize those who should come in before the year ends. It helps ensure no patient misses out on important care due to unused benefits.
Locate the Treatment Plan Manager by navigating to your main menu in Practice-Web and click on Reports > Standard > Treatment Plan Manager.
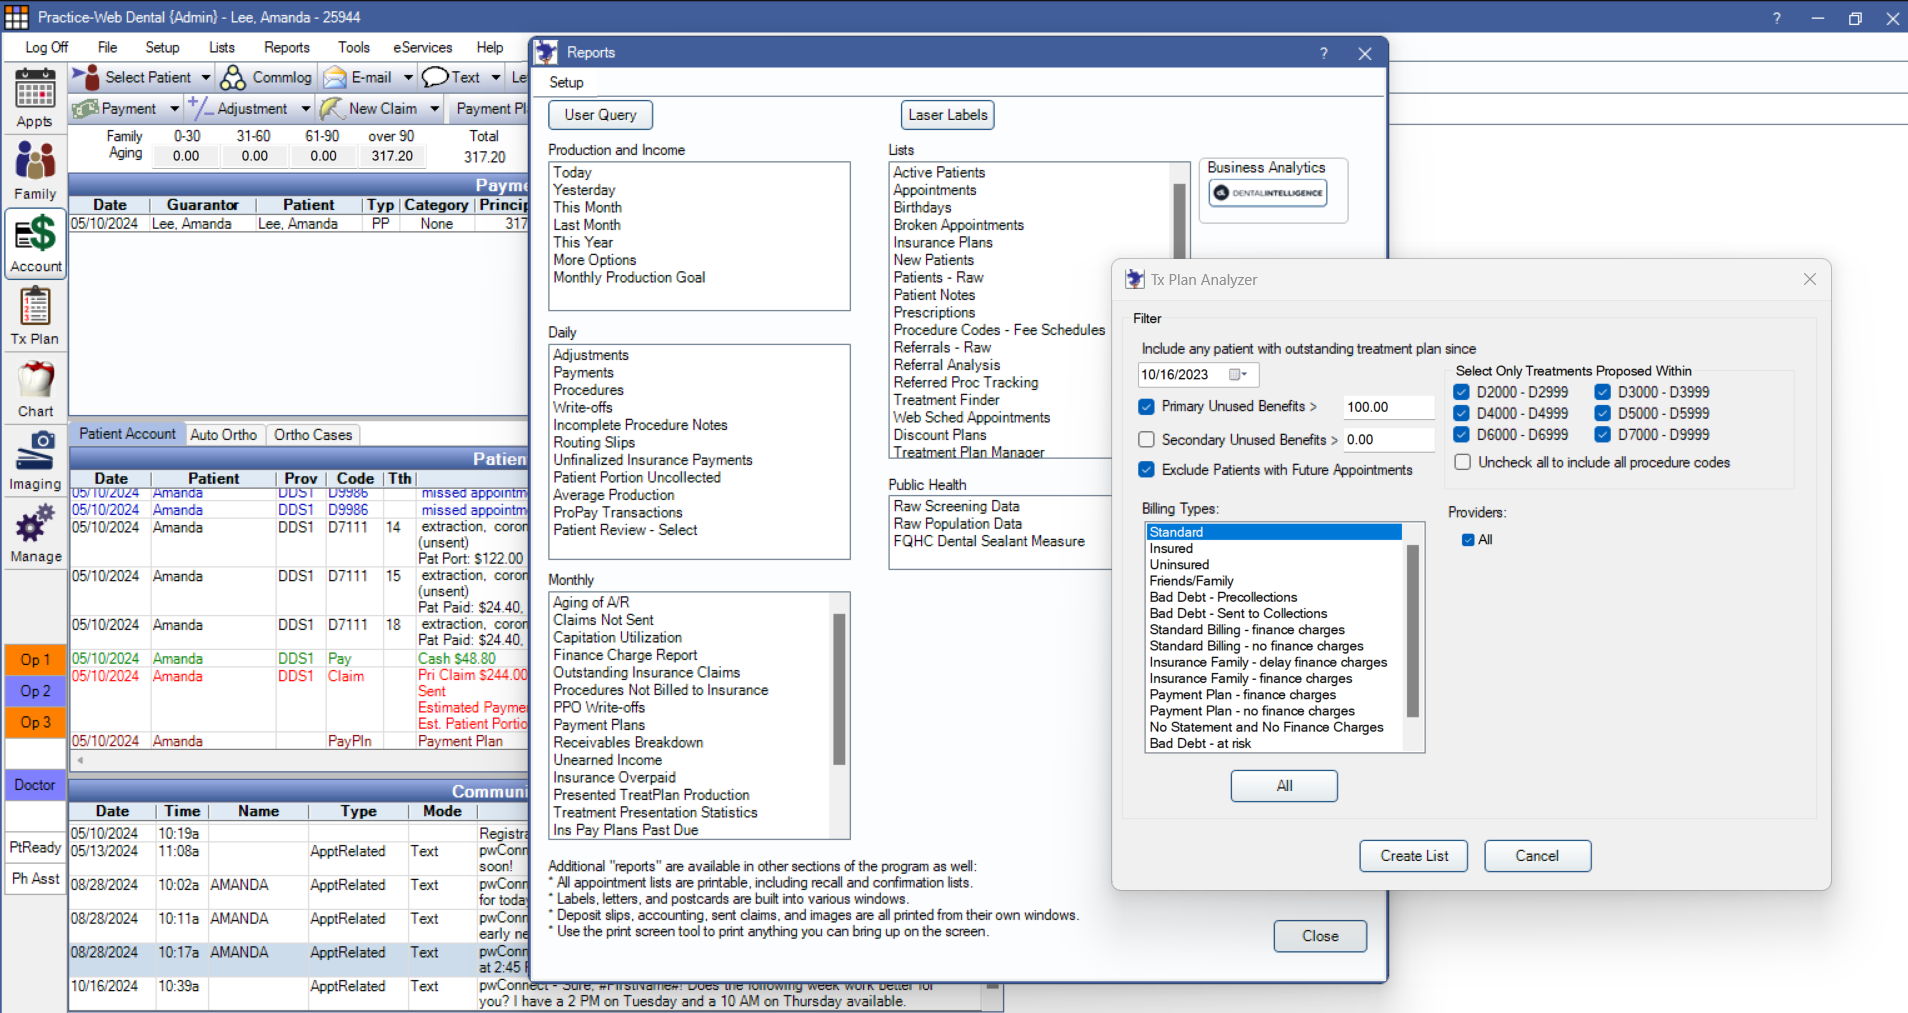
To generate your list of patients with outstanding treatment and insurance benefits remaining, select “Reports” in the main navigation bar of Practice-Web. Then, choose “Standard” from the dropdown menu and look for “Treatment Plan Manager” in the “Lists” section of the box that pops up.
Choose your date, check the box next to “Primary Unused Benefits,” and choose your minimum dollar amount threshold. This will indicate the dollar amount a patient has remaining before they reach their insurance maximum.
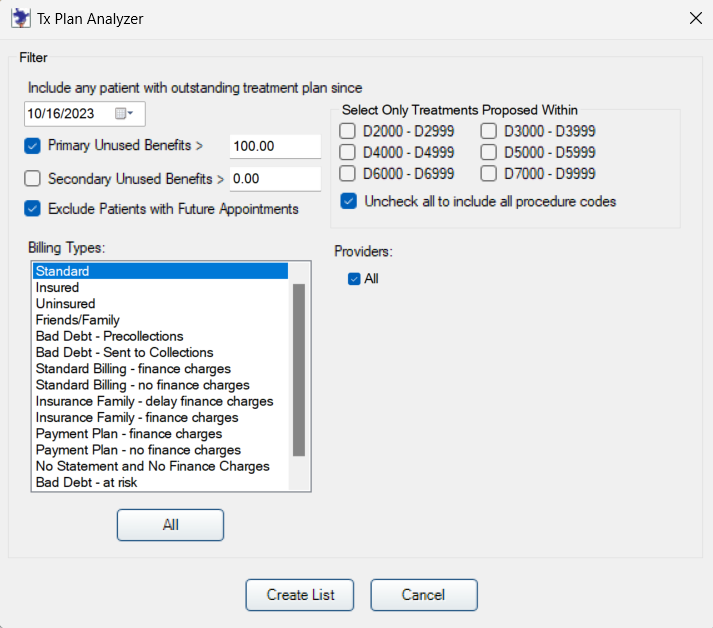
Most patients don’t have a secondary dental insurance, so it’s optional to include any Secondary Unused Benefits.
Check the box next to “Exclude Patients with Future Appointments” – this ensures that patients with future appointments won’t be contacted. If you’re worried your team is not communicating the need to schedule treatment at recall visits and during other contact points, you can leave this box unchecked. You can let patients know it was a blanket message if they call the office to inquire about upcoming appointments.
In most cases, your billing type will be “Standard.” When choosing treatments proposed within specific code ranges, remember that it’s better to leave all code ranges checked when your goal is to boost production at the end of the year. However, if you’ve delayed sending your notices and you’re unsure if lab cases will be returned by the end of the year, you may want to exclude codes for crowns, bridges, implants, and the like, as insurance companies typically use the seat or delivery date for payment.
You might also want to select specific treatment codes when running this report throughout the year if you want to target specific patients with marketing messages.
If you want to identify patients for only certain doctors or eliminate hygienists if they are fully booked, you can choose a provider next to the “Choose Provider” box.
Once you have all of your options selected, click “Create List.” You’ll receive a pop-up notice that it may take a few minutes.
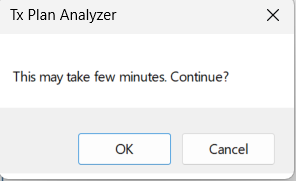
The length of time varies based on the amount of data the system is searching, but most practices will see the list generate within a matter of seconds.
Watch this video to learn more about how to schedule treatment plans with year-end benefits.
Target Your Communications Through pwNewsletter and pwConnect to Get Patients in the Door
After generating your patient list, it’s time to reach out.
Sure, you could mail post cards or print labels from the Treatment Plan Analyzer and stuff hundreds of envelopes. You could even print a list of patients and have a staff member call each one. But there are better and faster ways to reach your patients within Practice-Web!
Practice-Web’s pwNewsletter service is not just for newsletters! You can send customized emails to your patients, reminding them of their remaining insurance benefits and the importance of booking an appointment. Use emails to promote your latest revenue-growing sale, or provide practice updates such as new hours and office changes. The options are endless. You can easily craft engaging messages, include a call-to-action, and provide easy scheduling options.
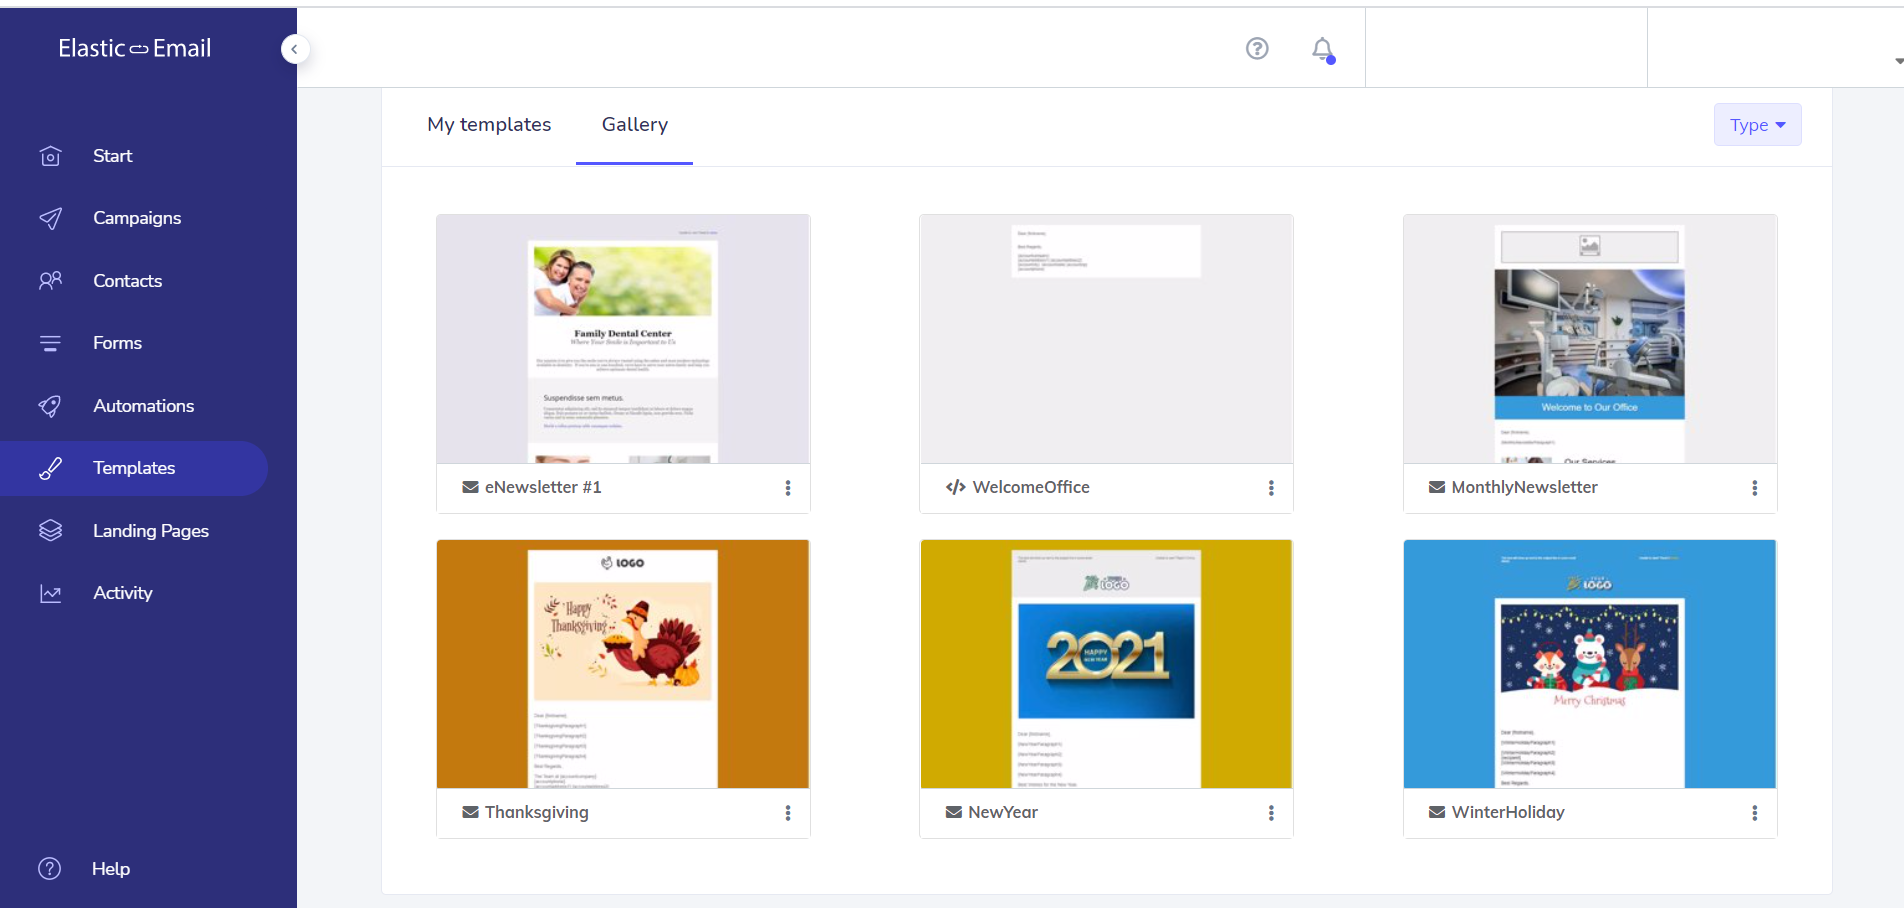
pwNewletter offers an intuitive drag-and-drop email builder that doesn’t require any kind of coding, so you can customize your emails quickly regardless of your technical background.
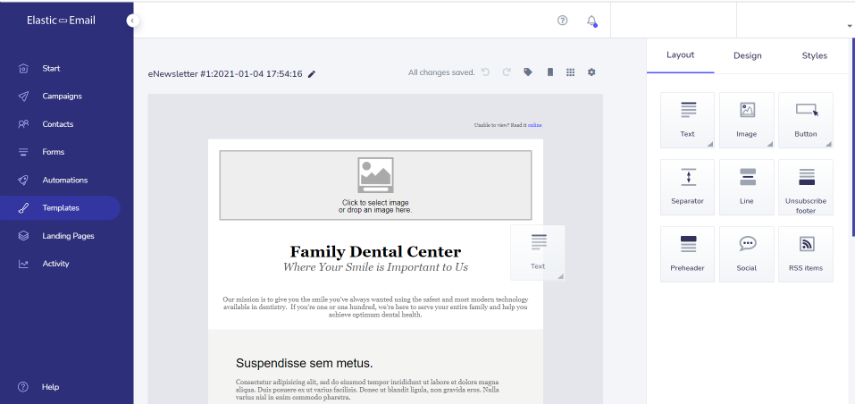
Fully integrated with your Practice-Web database, you can import your full contact list with just a few clicks. If you’re using Practice-Web Online Forms, email addresses are included in your patient paperwork, so you’ll always have the most current contact information for mailing.
Check out this video for a step-by-step guide on how to use pwNewsletter to easily and affordably reach segments of your patient base or everyone at once with important practice notices, newsletters, special offers, and more — no tech knowledge, expensive third-party programs, or coding necessary!
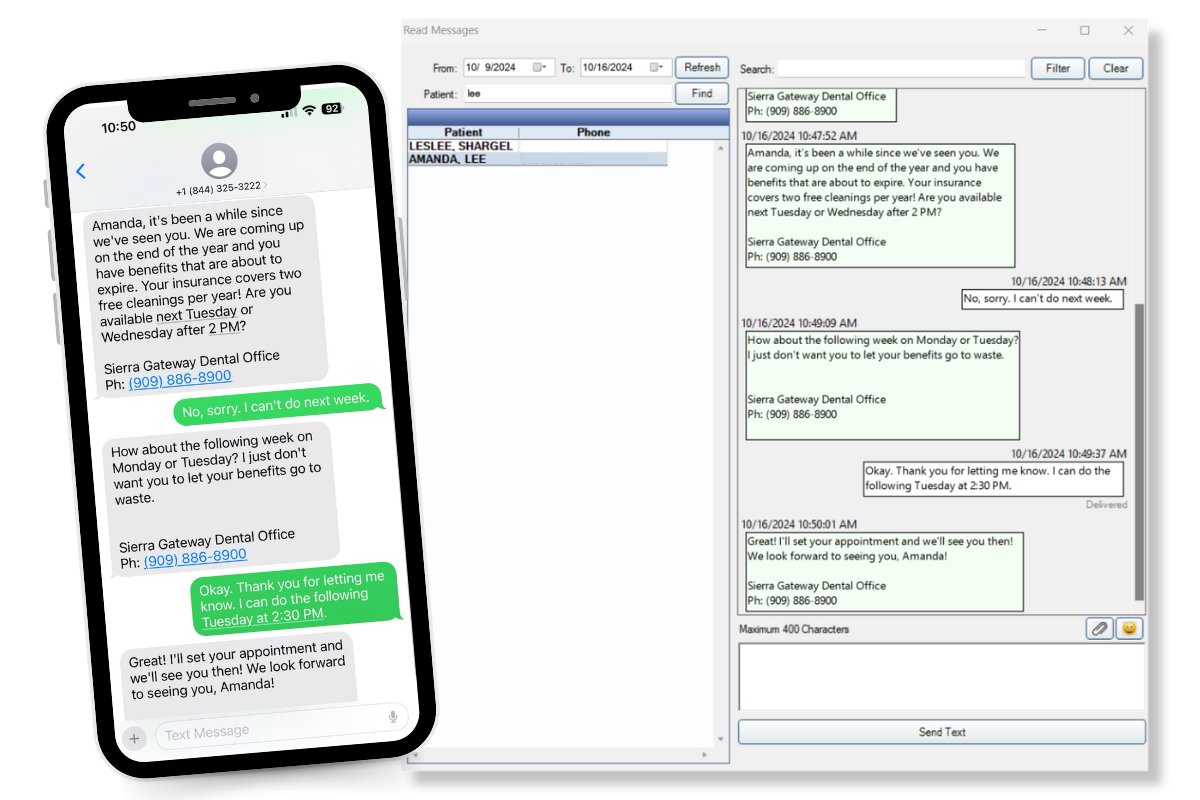
For an even more direct approach, pwConnect offers targeted text messaging. Send a personal message or reminder to patients right on their phones, giving them an immediate way to respond and book their appointment before the deadline.
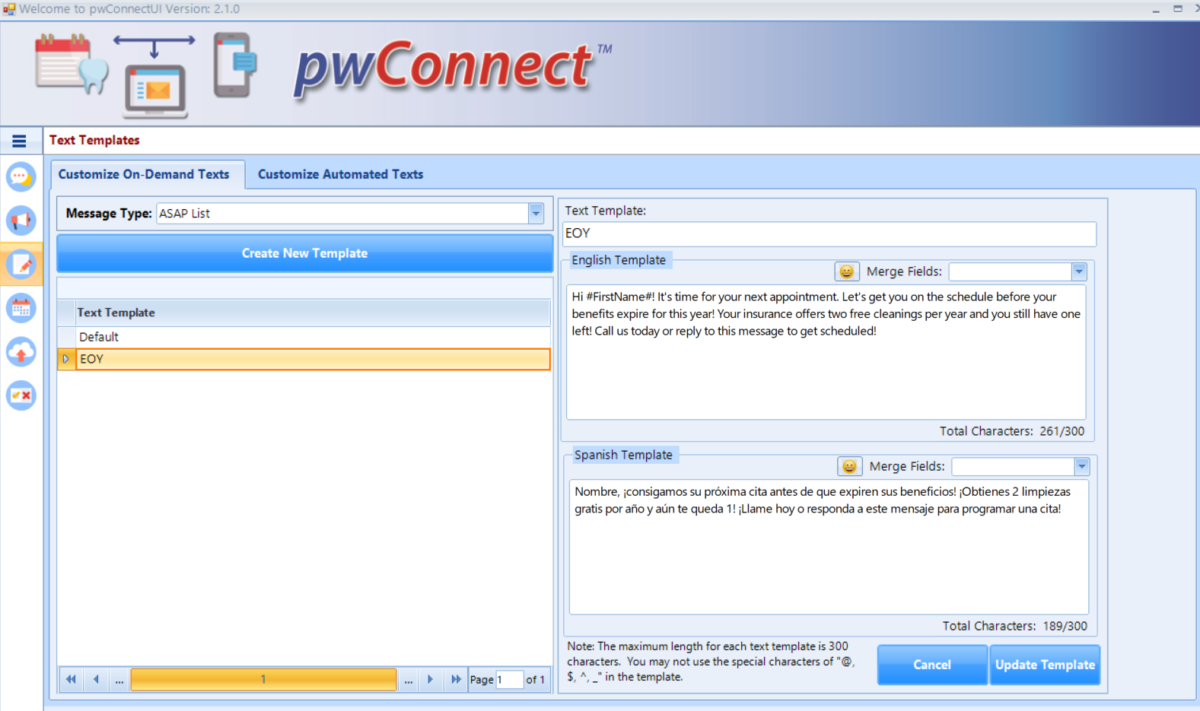
Patient’s can confirm appointments via text – which automatically updates your schedule – or ask to reschedule their treatment. Staff can text back and forth with patients right from within Practice-Web to answer any quick questions, reschedule appointments, and more.
Your communications should highlight the urgency of using benefits before they expire and emphasize how these procedures can save them money in the long run. Offering special year-end promotions, such as free consultations or discounts for booking early can further incentivize your patients to act.
The end of the year is a crucial time to fill your schedule and help patients maximize their benefits. With Practice-Web’s powerful tools – Treatment Finder, Treatment Plan Manager, pwNewsletter, and pwConnect – you can seamlessly identify patients, prioritize treatment, and drive year-end appointments.
Encourage your patients to act now and ensure your practice finishes the year strong!
Additional Resources: