Between claims denials and rejections and manual insurance processes, dentists can easily lose $185,000 per year ($5.5 million over a career!) plus waste countless hours chasing hard-earned production dollars.
Watch “Claims Acceptance Bootcamp: Ultimate Guide for Dental Billers” in full to explore critical reasons why claims are denied or delayed (with real examples), quick fixes that address them, and how to create protocols so you never have to chase another insurance dollar again or check out the high points in the recap below.
- Resources Mentioned in Claims Acceptance Bootcamp
- From Denial to Delight: Background on Dental Claims Acceptance
- Common Causes of Claim Validation Issues and Denials
- How to Set Yourself Up for Claims Acceptance Success
- Get Help Implementing These Claims Acceptance Strategies
Resources Mentioned in Claims Acceptance Bootcamp
General Resources
- Renew Practice-Web Support
- Get a Practice-Web Demo and Free Trial Version
- Contact Practice-Web Support
- Learn More About DentalXChange or Sign Up
Additional Resources
- Auto Notes and Quick Paste Notes (video tutorial)
- eClaims (product page)
- Insurance Overview (video tutorial)
- Insurance Claims, Payments and Reports (video tutorial)
- User Security and Permissions – covers Lock Days (video tutorial)
- ADA Coding Education Resource Center
From Denial to Delight: Background on Dental Claims Acceptance
Electronic Claims Processes Are Underutilized
When most people think of electronic claims, they think only of claim submission. In reality, there is a full spectrum of electronic claims processes. The other services are widely underutilized and include:
- Verification of eligibility and benefits: On-demand insurance verification is used by 75% of practices.
- Electronic attachments: Only 31% of practices send documentation such as x-rays and perio charting digitally.
- Claim submission: In all, 89% of practices send claims electronically.
- Status inquiry: Just 25% of practices check the status of their claims electronically.
- Payment: You can actually have your insurance payments sent electronically, but just 17% of practices do this.
- Remittance advice: Instead of waiting and getting info from the insurance company, you can be told what information is lacking in a claim and resubmit it right away to speed payment. Yet, just 36% of practices do this.
Full Adoption Saves Time and Money
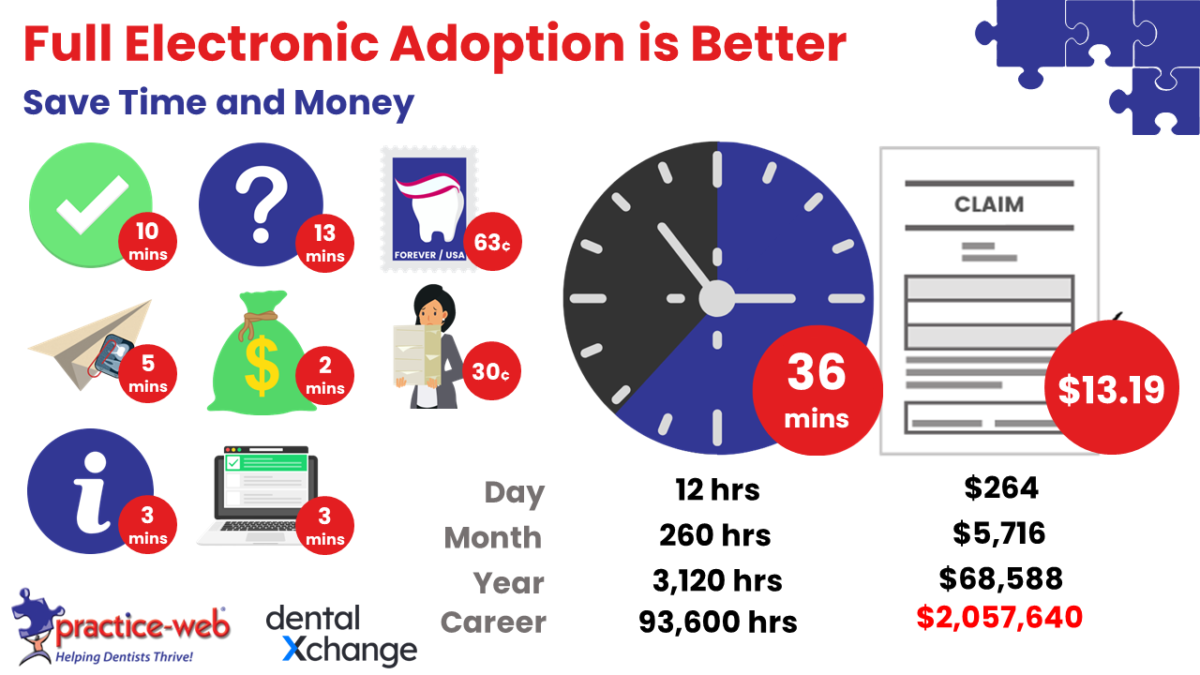
A typical practice that implements the full spectrum of electronic claims processes will save 12 hours per day and around $264. That’s 3,120 hours and $68,588 per year.
Over the course of a dentist’s career, it amounts to 93,600 hours and $2,057,640.
Validation Errors vs Denials
Validation errors are caught in Practice-Web or by DentalXChange prior to submitting your claim. Practice-Web automatically corrects many issues or prompts you to do so, while DentalXChange flags the claim, so you can correct the problem and then submit the claim. A missing insurance ID number would fall into this category.
Denials are determined by the carrier/ insurance company after a claim is submitted. Depending on the carrier, you may receive a notice in DentalXChange too.
Sometimes you can correct the issue and resubmit the claim and other times a denial is final. For instance, if the patient has no coverage, the denial is likely final. On the other hand, a denial because the patient didn’t meet criteria for coverage based on the data you submitted might get approved if you send a different explanation or more detailed documentation.
Denials Are Costly
On average, 13% of claims are denied. In a typical practice, that amounts to $117,000 per year. Over a career, it’s $3,510,000!
Manual Processes + Denials and Errors = $5 Million
When you add up the loss from manual processes and loss from claim denials and errors, it comes to $5,567,640!
Common Causes of Claim Validation Issues and Denials
1. Bad Provider Info
One in ten validation errors occurs because the the provider information on the claim doesn’t match the provider info in DentalXChange. Something as simple as imputing the provider ID wrong in one will trigger this type of validation error.
2. Incorrect Code Usage
Incorrect code usage typically falls into one of two categories: wrong codes or conflicting codes.
Wrong Codes
Submitting a posterior composite filling code with an anterior tooth number is an example of wrong code usage. Practice-Web Auto Codes will usually catch this type of error for you.
Conflicting Codes
Sometimes certain codes cannot be billed together. For instance, claims for a full-mouth debridement (FMD) with a comprehensive exam used to be denied quite a bit. In 2023, the ADA revamped its definition for FMD and clarified that it’s being done to enable a comprehensive perio exam at a later date. In other words, you can bill an FMD with a comp exam, but not with a comprehensive perio exam now.
The best way to avoid these types of mistakes is to keep up with the annual ADA CDT code changes.
3. Wrong Claim Forms
For the most part, you should be using the 2019 ADA claim form for most claims, but the ADA may release an updated version at any time. Failure to use the latest form can result in a denial.
Equally, some insurance companies require a special claim form. Medi-Cal Dental is one example.
It’s best practice to set your default form to the 2019 ADA claim form in Practice-Web, then adjust individual plans as needed. Most claim forms are already in Practice-Web, so you shouldn’t need to do anything besides selecting the appropriate default form and then changing it ones per plan on the rare occasions a carrier expects a different claim form.
4. Bad Benefits
Around 2% of validation errors ($18,000 annually) occur because benefits weren’t checked in advance of the appointment. To avoid this problem:
- Go electronic. Take advantage of Practice-Web’s insurance verification tools and DentalXChange’s electronic verification.
- Check eligibility monthly. If a person’s benefits end, it usually occurs at the end of the month. Therefore, you only need to check eligibility once per month. Do it a week before the appointment, so there’s time to resolve the issue or fill the hole in your schedule,
- Check benefits annually. Plan benefits usually only change once per year, when the plan rolls over. For the most part, that’s January 1. There’s no need to check more frequently than this in most cases because the benefits won’t change from one appointment or month to the next.
5. Missing Tooth Clauses
Some plans won’t pay anything for missing tooth replacements like dentures, bridges, or implants if the tooth was lost before the plan’s effective date. This is referred to as a “missing tooth clause.”
Always confirm if a plan has this rule. Because it can’t be tracked along other benefits or frequencies, add it to the “Insurance Plan Note” section in Practice-Web, so it appears in red in the plan window and you can adjust estimates accordingly.
6. Insufficient Narratives
Improve Your Workflow First
The insurance biller can only do their part with narratives if the practice has good processes in place. This incudes:
- Detailed clinical notes. The biller can get all the information they need to prove why treatment is necessary as long as the chart notes are detailed. SOAP notes are best. Try using Practice-Web Auto Notes for faster, more consistent charting.
- Have a deadline for completing chart notes. Ideally, clinical staff will complete chart notes on the day of treatment. Educate the team as to why this is necessary, then use Lock Days in Practice-Web to enforce it.
- Manage claims the next day. Once the data is entered in the patient chart and locked, your billing pro can start creating narratives and submitting claims.
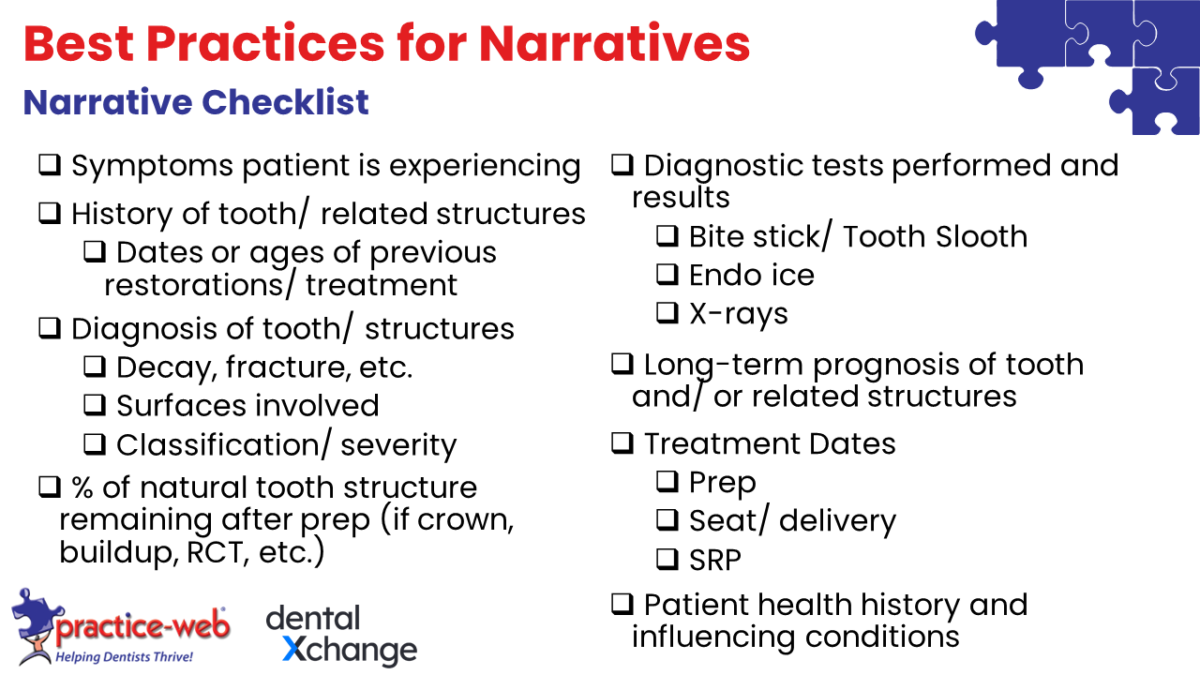
Use a Checklist to Confirm You’re Including Everything Needed
Consider Qualifying Reasons and Special Rules
Each insurance company will have its own guidelines for approval. For instance, some will only pay for a crown if more than 50% of the tooth structure is lost. Thankfully, many companies publish these guidelines online. Research the carriers you commonly bill and include one of their qualifying conditions in the narrative if one applies.
Sometimes insurance companies have unusual rules. For instance, many only allow two quads of SRP in one visit. If you submit more than two, any others will be denied.
This is where knowing the patient’s health history and influencing conditions can be incredibly helpful, as the insurance company may cover more if the patient is diabetic.
Other conditions/issues that may sometimes help get a claim paid are chemo, dry mouth, and pregnancy.
Use Extra Space if You Need It
Most of the time, you’ll add the narrative to the Claim Note section in Practice-Web. This feeds into the Remarks section on the claim form. However, it only has space for around 250 characters (two sentences).
If you need additional space, you can type in the claim attachment window instead. Note that this feature is only available to those using DentalXChange’s electronic attachments – a service that’s paired with e-claims.
7. Missing Treatment Dates
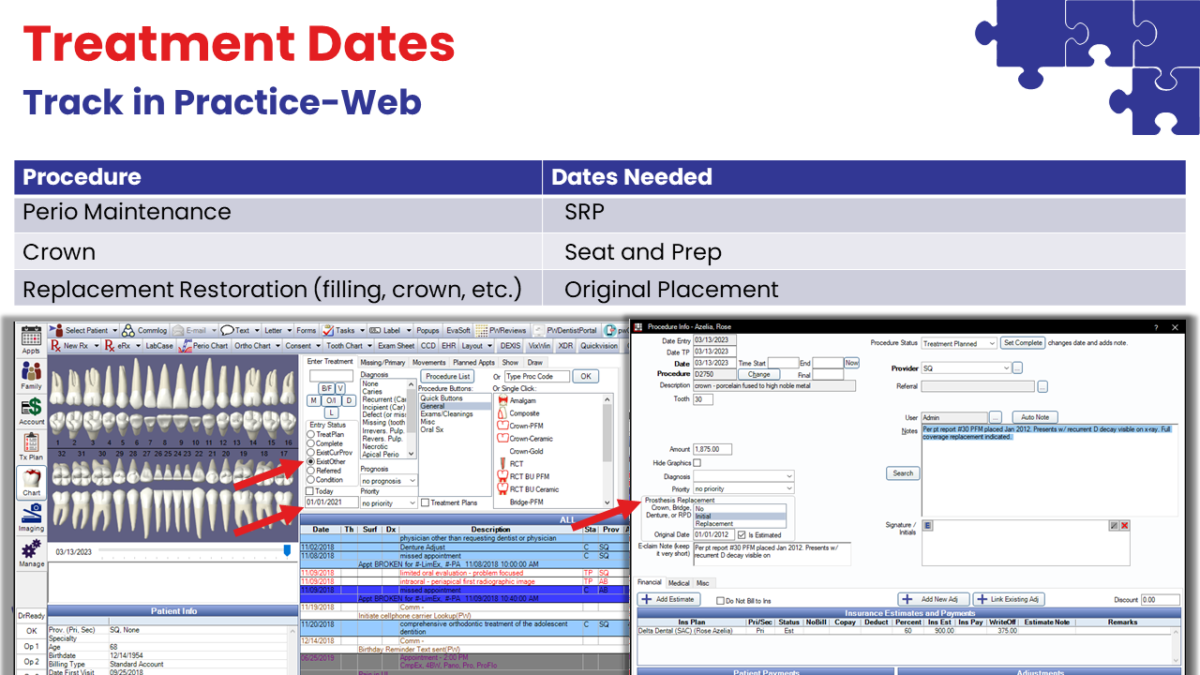
Certain procedures, like perio maintenance, crowns, and replacements, will require additional dates on the claims.
We recommend documenting a patient’s history during their first comprehensive exam and anytime the patent seeks treatment outside your office as it happens. This is done in the patient chart.
You’ll also need to add key dates to the procedure window when treatment is is diagnosed. That way, it’s already there for the biller and you’re less likely to see denials or validation errors.
8. Insufficient Documentation
X-rays, perio charting, intra-oral photos, and other supporting documentation is often required for major or periodontal treatment. If you have the claim attachment service, these can be added and sent digitally.
Some of this is simply a matter of knowing what the carriers you work with expect. DentalXChance can sometimes catch these issues with specific carriers too and will alert you if you need to attach something.
Because it literally takes seconds to send supporting documentation with this method, it’s best practice to send it if you’re unsure. You’ll see fewer denials and get paid faster that way.
How to Set Yourself Up for Claims Acceptance Success
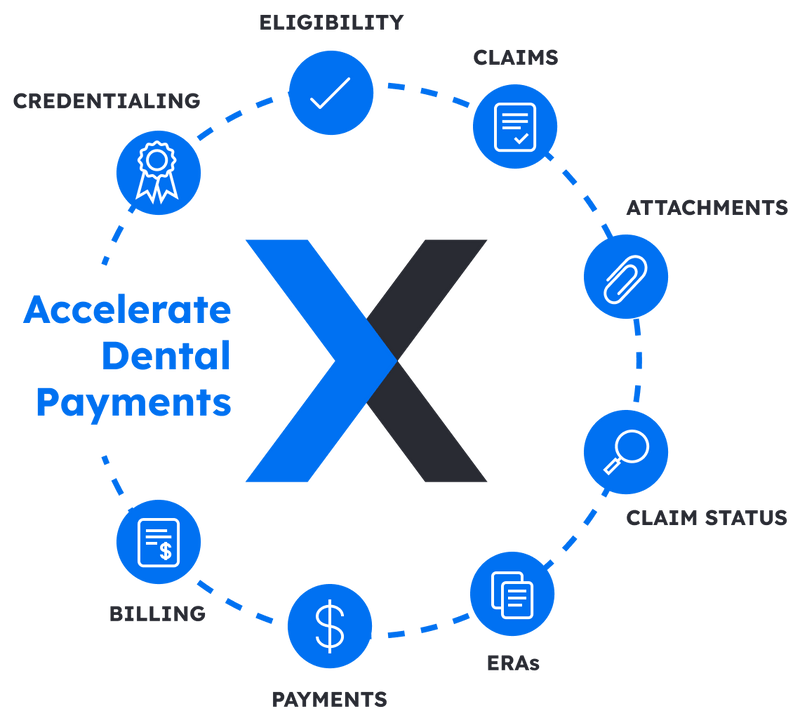
1. Use Full-Spectrum Electronic Claims Processes
Again, this starts with eligibility checks and goes through billing and payments. This will help your practice get paid more fully and get paid quicker, while saving you money overall.
2. Keep Practice-Web Current
Upgrades are FREE with Paid Support. The latest came with:
- The most recent ADA CDT codes
- Patient-level overrides for Frequency Limitations.
- Claims Waiting to Send displays if claim is primary or secondary.
- Display validation warning in Send Claims window when carrier does not support attachments.
- Attach claims to ERAs when they are imported.
3. Ensure Proper Clinical Documentation
Use SOAP notes, have a same-day deadline for clinical chart entry, and build/send claims the day after.
4. Allocate Resources
Ensure you have the right electronic tools, invest in team training, and give your billing pro dedicated time to work on claims without interruption.
5. Use Existing Features in Practice-Web
For instance, the outstanding claims report and custom claims tracking can help you stay on top of unpaid claims and get paid faster.
6. Be Thorough with Benefits Verifications
Some things that often get overlooked include:
- Payer ID: This is how DentalXChange knows where to send your claim. Sometimes carriers have more than one, so always confirm you have the right one. (DentalXChange will flag a non-existent payer ID, but it can’t always tell if you’re billing the wrong Delta, for instance.)
- LEAT Clause: LEAT is short for ‘least expensive alternative treatment.” It’s sometimes referred to as “downcoding” or “downgrading.” For instance, many insurance companies pay for composites at the amalgam rate. Others pay for a FMD at a prophy rate. Find out if any LEAT clauses apply on the plan.
- Unusual Codes: Let’s say your dentist sometimes bills for things like nutritional counseling, diagnostic casts, PPE, or even virtual visits. Always check these codes specifically when you verify benefits to see how they’re covered.
- Frequencies and Frequency History: Watch for things that are unusual here, like if the plan pays once per year, once per plan year, or once per 12 rolling months. Also note that insurance companies will often tell you the last date something was billed. This can be especially helpful with new patients when you want to take a pano, bitewings, and perform a cleaning.
You may want to build your own benefits verification form that includes these aspects if you’re manually contacting insurance companies. Either way, always make sure they get added to the benefits section in Practice-Web to help ensure the patient receives accurate estimates and you don’t wind up with denials.
7. Have a Plan for Unusual Codes
Before you start billing unusual codes, connect with the doctor to see how they want to handle it if the procedure is not covered.
Bill to patient? If the doctor wants to bill the patient for the procedure, always inform the patient about the value of the procedure and give them a heads up that it’s not likely to be covered. This helps eliminate frustration later while showing the patient that you’re providing the best standard of care.
Write off? Some practices opt to avoid conflict by writing off a balance left by these procedures.
Get Help Implementing These Claims Acceptance Strategies
- New to Practice-Web: Start with a demo.
- Current Clients with Support: Connect with our Support team for pointers and help implementing these strategies.
- Offices without Support: Connect with our Sales team for Support renewal and/or a Smart Tools consultation.

